2 Likes
#mount

Running the mount is a joint venture between the National Trust and the St Aubyn family who live in the castle.
The medieval castle perched on top is now a National Trust attraction along with the amazing coastal gardens on the grounds.
It’s a huge tourist attraction that sees well over 300,000 people visit every year!
As well as a hot spot for visitors, it’s also a living community with a working village and harbour. There are 35 lucky residents who call it home.
https://thirdeyetraveller.com/st-michaels-mount-causeway-tide-times-cornwall/
#St #Michaels #Mount Causeway & Tide Times: 14 Important Tips for Crossing in #Cornwall!
2 Likes
3 Comments
https://www.youtube.com/watch?v=F4QJi__T_FQ
Your #faith must be as mighty as #Mount Meru - #Sri #Haidakhan #Babaji
11 Jan 2015 ... ... #Surrender "What can a man not achieve when he surrenders to his #Guru ... Haidakhan Baba Ji Darshan | Part 3. Haidakhandi Samaj
1 Comments
1 Shares

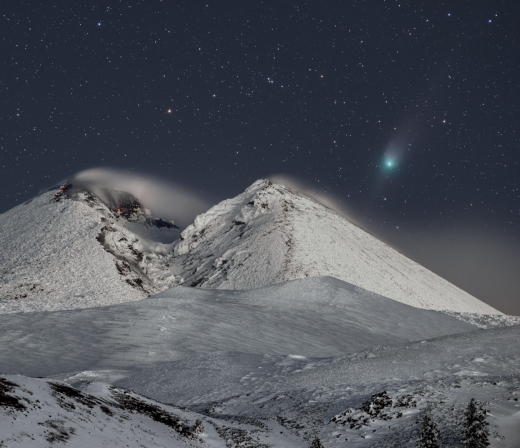
FIRE AND ICE-- #COMET ZTF OVER #MOUNT #ETNA: Astrophotographer Dario Giannobile has been yearning to photograph Comet ZTF (C/2022 E3). "Animated by this desire, I took advantage of the only night with clear skies that occurred in this last ten days of January," says Giannobile. "My destination? Snowy Mt. Etna!"
Mt. Etna in eastern #Sicily is one of the most active volcanoes in the world. Right now its hot vents are surrounded by deep snow--a marvelous yet challenging backdrop for comet photography.
"During the night the temperature dropped to -8°C at an altitude of 2000 meters, an exceptionally cold temperature for Sicily!" says Giannobile. "However, the landscape was breathtaking: an expanse of soft snow disturbed only by some fox and rabbit footprints. In the South East crater, some hot spots appear in the dark. They are fumaroles from which volcanic vapors come out... and in all this, the beauty of the sky with the splendid comet rising from the side of the volcano."
"The view was breathtaking, expressing, in a single image, a feeling of strength and delicacy, fire and ice."
5 Likes
2 Likes
1 Shares

Photo by Stas Bartnikas @stasbart / Located in Russia's Altay region, Mount Belukha is the highest mountain in Siberia at 4,506 meters (14,783 feet). This place is believed to have the strongest energy in all of Altay. Mystics say that the entrance to Shambhala, the place where the teachers of mankind lived, is located here. Well, it feels that way. It was a challenging flight. At 3,900 meters altitude, we practically reached the limit for a Robinson R44 helicopter, with strong winds, the door removed, the cold. [+]
Here's another shot from wikipedia...

26 Likes
10 Comments
1 Shares
automount CIFS share with autofs
This HowTo will prepare a Linux client to automatically mount CIFS shares from a remote Samba server on access/demand. Since I am mounting different filesystems, I have structured my mountpoints as follows:
<pre class="EnlighterJSRAW" data-enlighter-language="generic" data-enlighter-linenumbers="false" data-enlighter-theme="enlighter">/
├── home
│   ├── USER
│   │   ├── mnt
│   │   │   ├── cifs
│   │   │   │   ├── smb-server-a.fqdn
│   │   │   │   │   ├── share-a
│   │   │   │   │   ├── share-b
│   │   │   │   │   └── share-c
│   │   │   │   ├── smb-server-b.fqdn
│   │   │   │   │   ├── share-b
│   │   │   │   │   ├── share-b
│   │   │   │   │   └── share-c
│   │   │   ├── sshfs
│   │   │   │   ├── ssh-server-a.fqdn
From here on, I will use “mysambaserver.local” as the Samba servers FQDN, “mysambaserver” as its hostname, “myusername” as my username, “mygroup” as group and “myPassWord” as the password.
At time of writing, the server is running Ubuntu 18.04.4 LTS and the client is running Ubuntu 20.04.1 LTS.
This HowTo got compiled by trial and error and from these sources:
- https://wiki.ubuntuusers.de/Autofs/#Samba-Freigabe
- https://www.elektronik-kompendium.de/sites/raspberry-pi/2102201.htm
- https://wiki.ubuntuusers.de/Samba_Client_cifs/
- https://wiki.ubuntuusers.de/Gigolo/
- https://blog.marvin-menzerath.de/artikel/samba-freigaben-mit-autofs-automatisch-ein-aushaengen/
- https://www.howtoforge.com/accessing_windows_or_samba_shares_using_autofs
- https://wiki.samba.org/index.php/Mounting_samba_shares_from_a_unix_client
- https://kalitut.com/samba-shares-fstab/
Install Required packages, check supported filesystems
Install the required packages on the client (gigolo is just “nice to have”) and check if its kernel supports CIFS.
<pre class="EnlighterJSRAW" data-enlighter-language="shell" data-enlighter-linenumbers="false">apt-get install autofs cifs-utils smbclient gigolo gvfs-backends gvfs-fuse fuse
ls -1 /lib/modules/$(uname -r)/kernel/fs | grep "cifs"
<pre class="EnlighterJSRAW" data-enlighter-language="generic" data-enlighter-linenumbers="false" data-enlighter-theme="enlighter">cifs
Check remote SAMBA connection
Check remote connection to the Samba server:
<pre class="EnlighterJSRAW" data-enlighter-language="shell" data-enlighter-linenumbers="false">smbclient -N -L //<mysambaserver.local>/
<pre class="EnlighterJSRAW" data-enlighter-language="generic" data-enlighter-linenumbers="false" data-enlighter-theme="enlighter">

        Sharename       Type      Comment

        ---------       ----      -------

        share-a         Disk      Share A

        share-b         Disk      Share B

        share-c         Disk      Share C

        IPC$            IPC       IPC Service (mysambaserver server (Samba, Ubuntu))

SMB1 disabled -- no workgroup available
Check authenticated login
Check an authenticated remote login. If the command line asks for a password, enter the SMB password which is configured for the user at the Samba server (via smbpasswd).
<pre class="EnlighterJSRAW" data-enlighter-language="shell" data-enlighter-linenumbers="false">smbclient -U <myusername> -L //<mysambaserver.local>/
<pre class="EnlighterJSRAW" data-enlighter-language="generic" data-enlighter-linenumbers="false" data-enlighter-theme="enlighter">Enter WORKGROUP\myusername's password: [myPassWord] <--- enter the password


        Sharename       Type      Comment

        ---------       ----      -------

        share-a         Disk      Share A

        share-b         Disk      Share B

        share-c         Disk      Share C

        IPC$            IPC       IPC Service (mysambaserver server (Samba, Ubuntu))

SMB1 disabled -- no workgroup available
Create mount point
Create the mount point in the users home directory:
<pre class="EnlighterJSRAW" data-enlighter-language="shell" data-enlighter-linenumbers="false">mkdir -pv /home/<myusername>/mnt/cifs
chown -R <myusername>:<mygroup> /home/<myusername>/mnt/
autofs configuration
The configuration consists of the master map file (/etc/auto.master), the corresponding map file (/etc/auto.mysambaserver-cifs) and the key file which contains the credentials for authentication.
In the following we will configure autofs to mount shares to /home/<myusername>/mnt/cifs/<mysambaserver.local>/<share-name>.
Map file
Create the mapfile
<pre class="EnlighterJSRAW" data-enlighter-language="shell" data-enlighter-linenumbers="false">vim /etc/auto.<mysambaserver>-cifs
<pre class="EnlighterJSRAW" data-enlighter-language="shell" data-enlighter-theme="enlighter">#!/bin/bash
# $Id$
# This file must be executable to work! chmod 755!
set -x
KEY="${1}"
# Note: create a cred file for each windows/Samba-Server in your network
#       which requires password authentification.  The file should contain
#       exactly two lines:
#          username=user
#          password=*****
#       Please don't use blank spaces to separate the equal sign from the
#       user account name or password.
CREDFILE="/etc/autofs/keys/${KEY}"
# # !!!!!!!!!!!!!!!!! PAY ATTENTION TO the CIFS VERSION in MOUNTOPTS !!!!!!!!!!!!!!!!!!!!!!!!!!!
# https://www.raspberrypi.org/forums/viewtopic.php?t=201727 # https://www.raspberrypi.org/forums/viewtopic.php?t=211987
# http://krisko210.blogspot.com/2016/06/autofs-automount-nfs-share.html
# Note: Use cifs instead of smbfs:
MOUNTOPTS="-fstype=cifs,file_mode=0644,dir_mode=0755,nounix,uid=1000,gid=1000"
SMBCLIENTOPTS=""
for EACH in /bin /sbin /usr/bin /usr/sbin
do
        if [ -x $EACH/smbclient ]
        then
                SMBCLIENT=$EACH/smbclient
                break
        fi
done
[ -x $SMBCLIENT ] || exit 1
if [ -e "${CREDFILE}" ]
then
        MOUNTOPTS=$MOUNTOPTS",credentials=${CREDFILE}"
        SMBCLIENTOPTS="-A "$CREDFILE
else
        SMBCLIENTOPTS="-N"
fi
$SMBCLIENT $SMBCLIENTOPTS -gL "${KEY}" 2>/dev/null \
   | awk -v key="$KEY" -v opts="${MOUNTOPTS}" -F'|' -- '
        BEGIN   { ORS=""; first=1 }
        /Disk/  { if (first) { print opts; first=0 };
                  gsub(/ /, "\\ ", $2);
                  sub(/\$/, "\\$", $2);
                  print " \\\n\t /" $2, "://" key "/" $2 }
        END     { if (!first) print "\n"; else exit 1 }
        '
<pre class="EnlighterJSRAW" data-enlighter-language="shell" data-enlighter-linenumbers="false">chmod 755 /etc/auto.<mysambaserver>-cifs
This file is a slightly modified version of the file auto.smb which usually comes as part of the autofs package. You need to modify the line defining the mountopts above and change userid and groupid to the uid/gid of your personal account.
key file
Now you have to give autofs the credentials needed to access shares on your network. To do this create a key file
<pre class="EnlighterJSRAW" data-enlighter-language="shell" data-enlighter-linenumbers="false">mkdir -pv /etc/autofs/keys/
vim /etc/autofs/keys/<mysambaserver.local>
<pre class="EnlighterJSRAW" data-enlighter-language="generic" data-enlighter-theme="enlighter">username=<myusername>
password=<myPassWord>
<pre class="EnlighterJSRAW" data-enlighter-language="generic" data-enlighter-linenumbers="false">chown root:root /etc/autofs/keys/<mysambaserver.local>
chmod 600 /etc/autofs/keys/<mysambaserver.local>
Master-Map
The maps to be monitored are specified in this file.
Execute the following command to append the line “/home/myusername/mnt/cifs /etc/auto.mysambaserver-cifs –timeout=60” at the end of the /etc/auto.master file:
<pre class="EnlighterJSRAW" data-enlighter-language="shell" data-enlighter-linenumbers="false">echo "/home/<myusername>/mnt/cifs /etc/auto.<mysamabaserver>-cifs --timeout=60 --ghost" >>/etc/auto.master
The syntax here is: <Directory> <Map-File> [Parameter]
The shares should be unmounted after an inactivity of 60 seconds (–timeout=60) and empty directories should be created for the individual shares before mounting (–ghost).
Debugging
for debugging output stop the daemon and interactively start autofs with verbose output enabled
<pre class="EnlighterJSRAW" data-enlighter-language="shell" data-enlighter-linenumbers="false">service autofs stop
automount -f -v
You can restart autofs with
<pre class="EnlighterJSRAW" data-enlighter-language="shell" data-enlighter-linenumbers="false">service autofs start
Test
Use the following command to test if your setup is working
<pre class="EnlighterJSRAW" data-enlighter-language="shell" data-enlighter-linenumbers="false">ls -als /home/<myusername>/mnt/cifs/<mysambaserver.fqdn>/<share-name>
#autofs #cifs #filesystem #howto #linux #mount #mounting #samba #smb #ubuntu
Originally posted at: https://www.nanoscopic.de/2020/09/automount-cifs-share-with-autofs/
#linux #gnulinux #gnu @trisquel #ubuntu #shield #nvidia #networking #mount
I was not able to WRITE to my external hard drives that are connected to my NVIDIA SHIELD TV from my Linux Mint notebook over my network.
I would get a "dropped connection" error. With the release and improvement of Trisquel in version 8.0, i decided to give it a shot.
I was able to write to the drives connect to the NVIDIA SHIELD. I am not however able to download torrents directly to them. When I try to set the download location in Transmission, the NVIDIA shield does not appear in the "Computer" section.
Interesting to note that Linux Mint would not even write to them in the file explorer but Trisquel had no problem.
Trisquel is FLOSS and contains not even binar blobs of proprietary code in the linux kernel and is often criticized for lack of multimedia support and extra features that are only available with proprietary software.....so its very nice to see it working better out of the box than linux mint!!!
If anyone could help me with this, it would be very much appreciated.
Crypto reward for anyone who can successfully help.
Thank you.

