#landscapephotographer

petapixel@xn--y9azesw6bu.xn--y9a3aq

Photographing the Vibrant, Verdant Landscape of the Faroe Islands

image

Faroe Islands

Denver-based photographer Lazar Gintchin always dreamed of visiting the Faroe Islands. In 2021, he bit the bullet and booked his trip to photograph the remote but deeply-alluring archipelago that is tucked far away in the North Atlantic Ocean.

Originally from Bulgaria, Gintchin is now based in Denver, Colorado. Growing up, Gintchin was a stone's throw away from the Pirin Mountains, a picturesque mountain range with its own national park, hiking trails, and glacial lakes. From an early age, Gintchin "developed a deep appreciation for the beauty of nature," he tells PetaPixel.

Years later, he picked up photography and developed a creative eye to capture the wonders of the natural world around him, a passion that followed him after he moved to the United States.

A while ago, Gintchin came across a documentary about two Canadians traveling the world. As part of their journey, they went to the Faroe Islands and at the time, Gintchin hadn't heard about this place but was instantly fascinated by it's unusual beauty.

Faroe Islands Faroe Islands Faroe Islands

"I dreamed about photographing there one day, but it seemed like one of those far away dreams that never materialize," he says. "In 2021, I decided to pull the trigger and travel to the Faroes. I was attracted by several things: their unique natural beauty, the unusual landscapes, the remoteness, and the fact that still, very few people have traveled there. The trip was truly fantastic."

Although he had picked particular locations to visit, Gintchin gave himself the freedom to explore and photograph any scenes that he came across.

"This gave me a great combination of having both structure and freedom at the same time," Gintchin explains. "I believe this approach allowed me to create a very diverse collection of images from the Faroes."

Faroe Islands Faroe Islands Faroe Islands Faroe Islands Faroe Islands

For his photography trip, he used a Nikon D800 with a Nikon 24-120mm f/4 lens, attached to a Manfrotto tripod. Gintchin says he wanted to keep it simple and only chose one lens to bring along on the journey.

The shooting conditions outdoors can change in a matter of minutes. For that reason, Gintchin prefers a quick setup that doesn't "get in the way" and makes it easy to operate.

Faroe Islands Faroe Islands Faroe Islands

He recalls the first evening as "absolutely magic." Just a few hours after landing and seeing the beautiful landscape all around, he was mind-blown. That day he also shot his favorite image from the whole trip, titled Timeless. Gintchin also came across remote villages, seemingly situated on the edge of the earth.

"Timeless"

"The quiet, the peace, and the lush green mountains were incredible," he says. " I parked the car outside of the village and decided to enter and explore on foot, very slowly."

"I took my time to explore, enjoy, marvel, and photograph. The experience was amazing. The feeling was that of being far removed from civilization and immersed in the peace of a remote island village."

Faroe Islands Faroe Islands Faroe Islands Faroe Islands Faroe Islands

More of Gintchin's landscape work and prints can be found on his website and Instagram page.


Image credits: Photos by Lazar Gintchin.

#inspiration #spotlight #travel #faroeislands #landscape #landscapephotographer #landscapephotos #lazargintchin #nature #nikon #nikond800 #remote

petapixel@xn--y9azesw6bu.xn--y9a3aq

Fog Allows for ‘Impossible’ Photo of Milky Way Over Golden Gate Bridge

image


Photographer Michael Shainblum captured what was previously thought to be impossible due to heavy light pollution: a photo of both the Golden Gate Bridge and the Milky Way together.

It takes great determination to head out in the night and patiently wait hours to photograph a landscape scene that may or may not work out in the end. Shainblum wanted to combine some iconic elements together into a photo, but getting everything to fall into place perfectly was a gamble and the idea of seeing stars and the bridge together was, to this point, a pipe dream.

But he got extremely lucky thanks to perfect conditions.

Although he has captured fog numerous times before, such as in a forest and high up in mountains, he was able to join the brightly lit Golden Gate Bridge with the normally invisible Milky Way galaxy in one photo.

Normally, the San Francisco Bay is a terrible spot to try and photograph any stars and being able to capture the Milky Way at all in this location is incredibly uncommon. Shainblum tells PetaPixel that he has visited the site countless times but always had little to no stars visible due to heavy light pollution in the area.

"I think this was the perfect balance of a few different things," he explains. "The fog was thick and low enough to really block out most of the light pollution from the city, but the fog had also traveled so far inland that it covered most of the eastern bay as well. The clouds above just the eastern side around the cities may have also helped. The last thing is the time of evening and time of the season. I was photographing the Milky Way late at night as it started to glide across the western sky, away from the city."

Fog over Golden Gate Bridge

To make the photo, Shainblum took two rows of horizontal shots that he later stitched together in post-processing. Although at the time of capture he had no idea if it would result in a successful shot, he was pleased with what he made, especially considering the rarity of the circumstances. With the warmly lit bridge tower slightly pointing out of the thick fog on the left, the blue Milky Way delivers a contrast on the other side of the image.

Fog over Golden Gate Bridge

The one photo wasn't the only image he captured that night. Shainblum also took a "classic view" of the iconic bridge that many enjoy photographing. In the composition, he included both bridge towers, poking out of the soft fog that completely covered the scene, and the light trails of cars driving on the road.

To get different patterns of fog and variations of car light trails, Shainblum took multiple exposures and created a photo with colorful contrasts between the warm and cool tones.

Fog over Golden Gate Bridge

The Milky Way overlooking the hill deserved an image of its own, too. Unprepared to encounter a photo opportunity like this, Shainblum notes that photographers should take the chances when they present themselves, even if it means steering off the initial plan.

Fog over Golden Gate Bridge

Just before calling it a day, Shainblum took the few last long exposures of the bridge tower and the fog flowing past and through the gate for a simple, minimalist scene.

For photographers who are considering capturing the Milky Way, Shainblum recommends checking the weather first, such as on the National Oceanic and Atmospheric Administration website, noting the phase of the moon, which can be tracked using the PhotoPills app, and checking the light pollution.

When it comes to equipment, Shainblum recommends bringing a tripod and a wide lens, such as a 14mm-24mm full-frame lens, with an aperture f/2.8 or lower. In addition, a headlamp comes in handy, especially if the phone runs out of battery.

More of Shainblum’s educational and inspirational videos can be viewed on his YouTube and his photographic and video work can be found on his website and Instagram.


Image credits: Photos by Michael Shainblum.

#inspiration #spotlight #travel #fog #landscape #landscapehotography #landscapephotographer #michaelshainblum #milkyway #milkywayphotography #sanfrancisco

petapixel@xn--y9azesw6bu.xn--y9a3aq

Photographing Fog on Both Film and Digital

image

For photographers curious about using either film or digital to capture foggy landscape, Michael Shainblum has put together a video showing the behind-the-scenes of using both mediums with a telephoto lens.

Shainblum, a passionate landscape photographer and filmmaker, often switches between a wide-angle and a telephoto lens, depending on the subject at hand. He has shared in the past the different ways to use a telephoto lens for landscape work, such as when shooting minimalist scenes of sand dunes or when looking for compelling and unique shots in areas that have been photographed by many, such as Yosemite National Park.

This time, when Shainblum headed up the mountains to photograph the scenic views filled with fog, he took his Sony Alpha 1 with a Sigma 100-400mm zoom lens alongside a 35mm Nikon FE camera body loaded with a roll of Portra 400 film and also equipped with a telephoto lens.

Fog rolling through a valley at sunrise or sunset

The beauty (and the challenge) of photographing fog is that the scene in front of the camera continuously changes, revealing new opportunities for compositions. As the fog passes through the trees and as the light changes, no one frame will be the same as the previous one.

A foggy landscape by photographer Michael Shainblum

A foggy landscape by photographer Michael Shainblum

Similarly, a telephoto lens, if used from a good vantage point, gives numerous ways to capture the landscape, for example by zooming in on a pattern or a particular detail that a wide lens wouldn't reach.

A long exposure photo of fogLong exposure creates soft blur in the fog

When photographing in foggy conditions, photographers have the choice of shooting shorter exposures to capture the texture of the fog or opting for a longer one that blurs out and softens its movement. During his trip, Shainblum experimented with both and also added his film camera to the mix to capture the exact same scene with both cameras.

A foggy landscape photoTaken with Nikon FE A foggy landscape photoTaken with Sony Alpha 1

Although the results delivered from both digital and film are different, the subjective preference of the medium is down to the photographer themselves. All in all, for Shainblum, the experience of photographing fog can be therapeutic, whether it is shot with a film or digital camera.

A foggy landscape by photographer Michael ShainblumTaken with Nikon FE A foggy landscape by photographer Michael ShainblumTaken with Sony Alpha 1

In fact, although Shainblum usually has his camera with him, there are plenty of times where the soothing experience of simply watching the changing landscape can be more than enough.

More of Shainblum’s educational and inspirational videos can be viewed on his YouTube and his photographic and video work can be found on his website and Instagram.


Image credits: All images by Michael Shainblum and used with permission.

#inspiration #tips #travel #35mm #analog #film #filmphotographers #filmphotography #fog #landscape #landscapehotography #landscapephotographer #michaelshainblum #sonyalpha1

petapixel@xn--y9azesw6bu.xn--y9a3aq

Photographer Paraglides Over West Virginia for Breathtaking Aerial Photos

image

Photographer Bernard Chen felt that there was more to aerial photography than drones and learned how to paraglide so that he could fly across West Virginia and capture the area in a new way.

Based in Northern Virginia, Chen grew up on a farm and developed a strong connection with all things nature. An adventurer and explorer at heart, Chen views his work as born out of the harmony between his fascination with the visual image and his wonder at the natural world.

"My photography allows me to explore and encounter the world around me," he tells PetaPixel. "I feel most connected with the natural world in those moments when I'm waiting for it to reveal something to me -- waiting for a cloud to move, the light to change, a breeze to lift or drop. I believe in discovery, wonder, and the infinite power of nature to surprise us."

Chen's story is similar to others who felt the same call to the sky, like photographer George Steinmetz who flew a motorized paraglider across Africa, or Alexandre Buisse who did the same in France and Italy.

It was this deep fascination with breathtaking landscapes that led Chen to buy his first drone in 2013 before they exploded in popularity. Although this opened up a whole new world for his photography, it didn't make as big of a turn compared to when he began spending time with adventurous people -- rock climbers, skydivers, base jumpers, and other adrenaline seekers.

"I would tell you if you want to improve your photography, befriend these kinds of active people, and they will show you a world you never thought was possible," says Chen. "Most landscape photographers wish to shoot from the top of the mountain or deep in a cave, and that group of active adventurers knows how to get you into that position for that shot."

The introduction to this active adventure world led Chen to backpack up Seneca Rocks, descend down in a cave in Alabama, jump out of a plane, and climb giant 300-feet redwood trees in California. All of which, unbeknownst to him at the time, prepared Chen for the future of flying across a place close to his heart -- Dolly Sods, Wilderness Area in the Allegheny Mountains of eastern West Virginia.

"I thought skydiving would be my ticket to filming from the air. But that's a one-way ticket down to the ground, which doesn't match what I wanted to do," he says. "I started paying attention to this sport, which looked very exciting, and this is a sport I could see myself flying with a camera."

The process of essentially becoming a human drone took ten months of flying training at Almost Heaven Power Paragliding, West Virginia to gain over 130 hours of flight time. This commitment wasn't easy -- Chen's first seven attempts of free flight experience were not successful.

After spending some time contemplating what is mentally blocking Chen to succeed, he came back ready and launched successfully.

"I didn't want to stop; flying was exhilarating!" says Chen. "I went from a shaking body to a fantastic state of bliss in a matter of seconds. It was an incredible feeling of accomplishment."

Once he become more comfortable in his training, he started to experiment with a GoPro. Once he mastered that in flight, he added more cameras to his motor, eventually strapping his Sony A7R IV and Sony 24-105mm lens to his chest.

"Flying with cameras was finally coming together, but learning to take pictures while flying was not an easy task. Unlike drones, I'm always moving; any adjustments to settings have to be completed with one hand. Flying low gets you the best compositions and brings the most danger. Once I put all this together, I can start planning flights for some incredible locations, and Dolly Sods was at the top of my list of dream flights."

Although some might ask why Chen is going through all of this effort for aerial photography and isn't simply using a drone, his answer lies in what is accessible to photographers. In the United States, drones are limited to a maximum altitude of 400 feet, whereas flying can get Chen as high as 18,000 feet.

The ability to stay up in the air for two to three hours also opens up many avenues of getting interesting and picturesque images, while making the most of paramotor which doesn't require an airstrip to launch.

After accomplishing his dream of flying over Dolly Sods, Chen is looking forward to an Iceland flight in 2022 as well as expressed a desire to visit locations across Southwest and Alaska.

"I can see myself having three cine cameras mounted, recording different angles while in flight. It will be an experiment to see what works, but I like this challenge; it's what keeps me inspired to explore our beautiful planet."

More of Chen's work can be found on his website and Vimeo page.


Image credits: All images provided courtesy of Bernard Chen and used with permission.

#inspiration #travel #adventure #aerial #aerialphotographer #bernardchen #flying #landscape #landscapephotographer #paraglider #paragliding

petapixel@xn--y9azesw6bu.xn--y9a3aq

Dunes and Clouds: Photographing Symmetry in the Desert

image

In 1991, near the end of some book projects that took me on some lengthy photographic journeys through the American West by car for two years, I came up with the idea of creating posters of some of my black and white images for a few of our western National Parks.

My idea was to provide park visitors with a choice instead of the commonplace color posters. Some of those color posters were excellent but I felt there was a large audience who appreciate black and white. My idea, which I pitched to some of my favorite parks, was to provide the visitors with a "fine art" visual interpretation in black and white.

My original attempts were met with great interest by the various Natural History Associations. Most were already familiar with my photography because of various photographic projects such as magazine articles, gallery/museum shows, or word-of-mouth. I had completed a color slide show for Capitol Reef National Park a few years before, and my black and white work was already known by some Natural History executives of Canyonlands and Death Valley National Parks.

In this four-part series written for the ELEMENTS Magazine , I am discussing most of these posters (Read parts one and two). I'll give technical information where my memory serves me correctly, aesthetic considerations and some highlights of making the photographs on the scene. Please join me on this journey through the past!


Dunes and Clouds

The third poster I made for Death Valley is Dunes and Clouds. This was the second dunes image that was made into a poster. The Park thought my first image did not show the expansive range of the dune environment, so I proposed making a new image. I got up before sunrise at the Stovepipe Wells campground, drove a short distance, packed up my 4×5 camera which I routinely fit into my backpack for short to medium distance hikes (with the front and rear stages disconnected to fit), set my heavy Bogen tripod across the top, hung my trusty viewing cut-out card from the tripod head, and trekked into the dunes.

Shortly after sunrise I found this interesting symmetrical composition. The dunes were not sufficient to make this an expressive image but the clouds, filling the sky with patterns contrary to the foreground sand ripples, and even some clouds echoing the sand ripples, immediately made this the image I had to make. My records indicate I used a graduated ND filter in the lens shade hoping to reduce the brightness of the sky and clouds, bringing them under control in the negative. I made the exposure on TMax 100 film just as a slight breeze got up. I decided to expose a sheet of Ektachrome 4×5 color transparency film. Just as I finished the color exposure, the wind became fierce, whipping sand into my face and onto the camera. I hastily put the camera into my backpack, which was no easy task in the now raging sandstorm! I could barely see, squinting to prevent the sand particles from getting in my eyes. On the way back to the car I had to lean against the blowing wind and sand to maintain my balance.

I developed the negative N+1 (over-develop) to increase contrast, knowing that the graduated neutral density filter would prevent the clouds from blowing out and losing detail. I was surprised to see minimal dust spots on the film, and the exposure was excellent! All the desired image values were recorded well on the film. Even so, this was a difficult print to make. The values were uneven, so substantial burning and dodging had to be done to achieve a well-balanced clean image (something I feel is necessary for a symmetrical composition like this).

I showed a mock-up to the Park personnel and was given the "thumbs up" for a sand dunes poster. Fortunately, the poster was relatively easy to print. Using a high-density black ink and pms409 grey ink (which the printers nicknamed "Radeka Grey"), on glossy paper, it was mainly a matter of printing with enough black density to yield a visually satisfying image. My trilogy of posters for Death Valley was complete!


The article is courtesy ofELEMENTS Magazine. ELEMENTS is a monthly magazine dedicated to elegant landscape photography, insightful editorials and fluid, clean design. Inside you will find an exclusive and in-depth articles and imagery by the best landscape photographers in the world such as Bruce Barnbaum, Christopher Burkett, Chuck Kimmerle, Christian Fletcher, Charlie Waite, Rachael Talibart, Erin Babnik and Freeman Patterson, to name a few. Use the PETAPIXEL10 code for a 10% discount off the annual subscription.


_About the author: Lynn Radeka’s professional photography career spans more than 50 years. Influenced in his early work by Ansel Adams and Wynn Bullock, both of whom critiqued his prints, he continues to pursue a technical and aesthetic mastery of the medium of photography. His love of the grand landscapes and intimate details of the American West was born on his first trip to Death Valley in 1966.

Lynn Radeka’s Black and White photography has been featured in eight National Park posters and is represented by several galleries throughout the United States and Europe. He also has the honor of being a featured photographer in the recent book publication "World's Top Photographers: Landscape." Lynn Radeka currently leads photography workshops in Death Valley, Utah and New Mexico with many more locations planned for the near future._

#inspiration #analog #deathvalley #desert #elements #elementsmagazine #film #filmphotography #fineartlandscapephotography #landscape #landscapephotographer #landscapephotography #lynnradeka #storybehindthephoto #storybehindtheshot #travel

petapixel@xn--y9azesw6bu.xn--y9a3aq

‘Living in Long Shadows’ is a New SmugMug Film Featuring Andy Best

image

SmugMug has debuted its latest film that features photographer and filmmaker Andy Best. Called "Living in Long Shadows," the film follows the Best family as they trek across the American Southwest.

Andy Best is likely most accurately described as an adventurer and explorer as much as he is a photographer. He often lives in a camper as he road trips across the country with his family -- he has a wife and two kids. Best, who is also one of Sony's founding Alpha Imaging Collective members, has photographed countless outdoor adventures thanks to the nomadic lifestyle he chooses to live.

He has partnered with National Geographic Adventure, ROAM, and other well-known adventure media outlets, all while maintaining a family and living a life without a firmly planted "home base," a type of lifestyle few can say they successfully keep. Not many would say they even would want to, but for Best, it is the only way.

“I've always been into photography,” Best says in an interview with Alpha Universe in 2019, “But I never really wanted it to be part of my daily job because it was such a passion. I was afraid if it became work, it wouldn’t be as meaningful and I wouldn’t find as much joy in it.”

Best says that he has studied art his entire life, starting with pastels, sketching, and oil painting dating back to his time in his grandmother's studio. He attended film school in Portland, Oregon before working as an independent commercial filmmaker. Eventually, he transitioned to photography as well.

Today, Best says that his location-independent living is key to his success. He tells SmugMug that he is able to take work wherever it presents itself and focus on his mission of capturing photos and videos that highlight the beauty of the Earth along the way.

Best has spent the better part of a decade on the road and says he continually seeks inspiration in our wild places and the different people he meets along the way.

"Creating experiences for my children, while having the unique opportunity to work from the road, allows me to be more present in my family's lives and produce the best work possible,” he says. “This is a chapter we'll never forget! I hope you enjoy our story."


_Image credits: Behind the scenes images courtesy of SmugMug. All other photos by Andy Best. All images used with permission. _

#inspiration #adventure #adventurephotographer #americansouthwest #andybest #landscapephotographer #landscapephotography #nomadic #outdoorphotographer #smugmug #smugmugfilms

petapixel@xn--y9azesw6bu.xn--y9a3aq

Photographing Waves: One of The Most Rewarding Subjects

image

Waves are some of the most rewarding subjects for photography that I know. For starters, if you miss one, another will be along very soon! Of course, they are also unpredictable and can be dangerous. What is fascinating is that no single wave will be exactly the same as any other wave that has existed since the beginning of time. Mind-blowing stuff.

When you’re starting out in wave photography, it is helpful to have a rudimentary understanding of different types of waves and what you’re likely to encounter on different beaches. Wide beaches with shallow falls typically experience long, rolling breakers. These graceful waves are a pleasure to photograph. The curl of a rolling wave is attractive but this perspective can be elusive as the topography of the coast often fails to offer a side-on angle.


This story is brought to you byELEMENTS Magazine. ELEMENTS is the new monthly magazine dedicated to the finest landscape photography, insightful editorials and fluid, clean design. Use the PETAPIXEL10 code for a 10% discount off the annual subscription.


Some photographers take to the water with waterproof camera housings and capture amazing moments within or even underneath waves (although not on the beaches where I make photos!). Obviously, this approach is for confident swimmers and, if you want to try it out, I strongly recommend that you first spend time getting to know your location and how to navigate the waves there safely. However, if it isn’t safe to swim or you’d simply prefer to stay on terra firma, don’t give up just because you can’t access the popular “curl.” A front-on perspective can also work; the moment a breaker starts to drop is often all that’s needed to break the line and add visual interest.

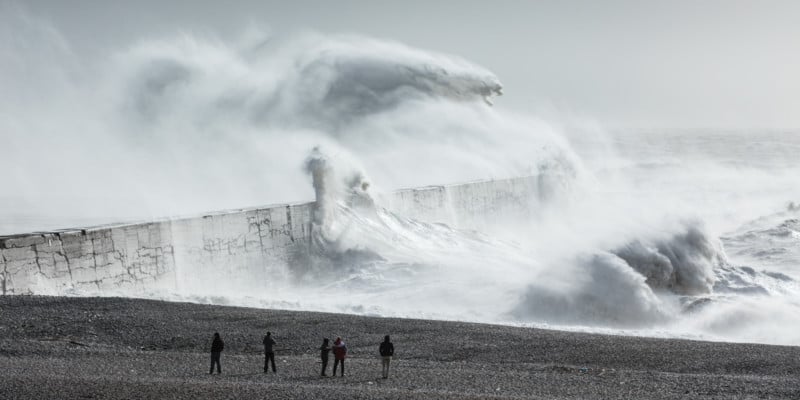
On steeper, narrower beaches, there may be backwash. This is when water that has travelled up the beach falls back with enough power that, when it meets another wave, the water is pushed upwards, creating a wall. This is a marvellous subject and you can go wide to show the impact in its setting or zoom in tight to explore the textures. “Clapotis” is a sort of backwash wave. This lovely French word describes the moment that a wave, having bounced off a quay or cliff, crashes into another wave. The shapes often seem to defy gravity. This sort of photography is more like sports or wildlife than landscape work. Fast shutter speeds, responsive focusing and quick reflexes are the order of the day. I suggest you use high-speed continuous or burst mode and run off 3 or four frames for each wave.

As with everything, it pays to know your location and to have done your research. For example, if the wind is blowing from the north, there’s little point in visiting a south-facing beach backed by cliffs. However, if the land behind the beach is flat, a strong offshore wind may be ideal as it will hold back the waves, making them pile higher, and you’ll get spindrift off the top. Equally, think about the tide and the light. There are usually fewer waves at low tide. Harsh midday sun is difficult, and you’ll likely need a polariser to mitigate the shiny patches of water whereas backlit waves can be gorgeous when the sun is low.

Point of view makes all the difference and there are so many variations on the standard, head-height position. If you can get low, your waves will stand proud of the horizon. Not every beach gets big waves, but they all get waves of some sort, even if just from the wake of passing vessels. If you lie on the beach, even small waves can look mighty.

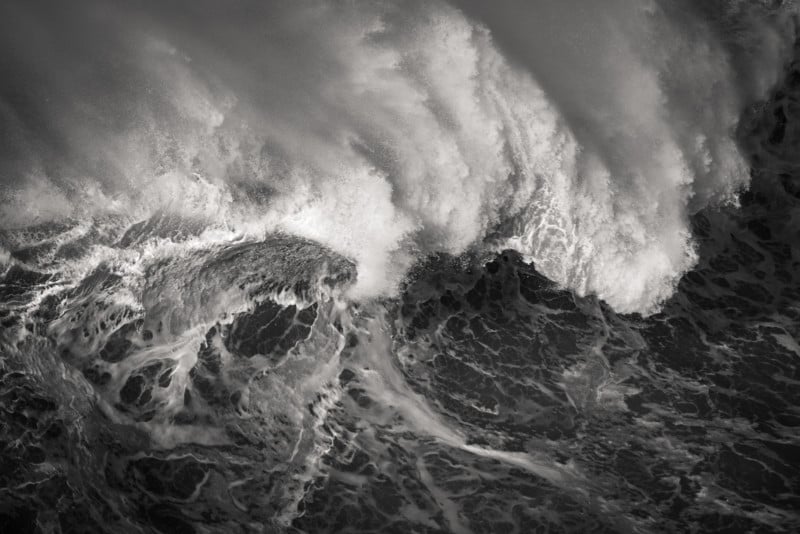
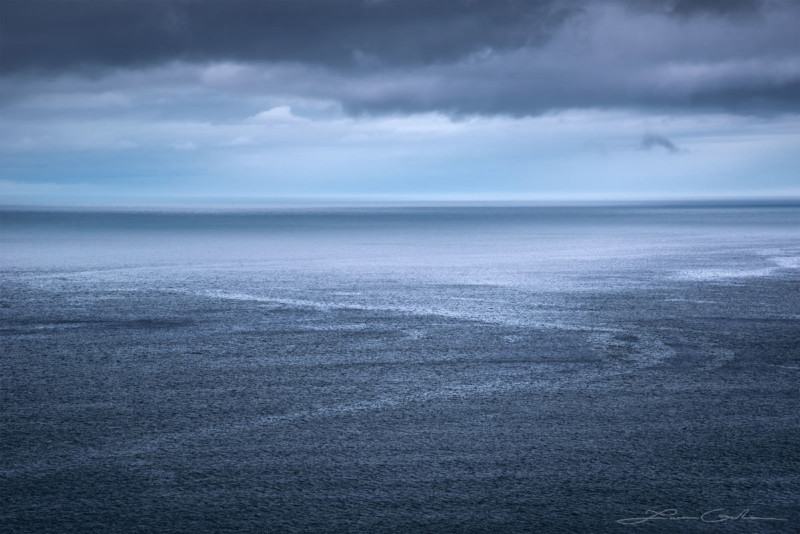
Alternatively, try a higher point of view, a clifftop perhaps. Photos taken from above are no longer about the size of the waves. Instead, they make the pattern the star of the show. Waves leave in their wake wonderful shapes that we never see from beach level. Next time you watch the sea from a cliff, notice the beauty of a wave’s footprint.

The sea is always moving so shutter speed is probably your biggest decision; 1/800 or faster will freeze the waves, capturing all the detail. However, slower shutter speeds are also hugely enjoyable. I particularly like ¼” as it keeps the wave’s overall shape, but the details seem like brushstrokes. In my photos, “Theia” and “Twist,” the waves are the same basic shape, but one is caught at 1/800 and one at ¼”. While we’re experimenting, how about adding some intentional camera movement. I like shutter speeds close to 1” and subtle movement so that I can still see the idea of a wave within the blur. I prefer not to use a tripod for ICM. I’m not looking for perfection here – I want the result to look like a painting and paintings aren’t perfect, at least the good ones aren’t.

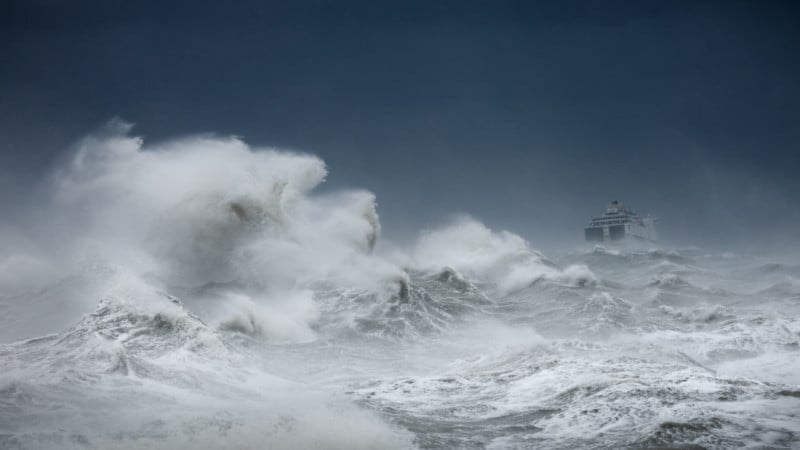
If you’ve ever tried to photograph waves and been disappointed, I suggest you try a longer focal length. It will suck the viewer into the action and the wave will almost certainly look more exciting. Most of my storm waves were captured using a 70-200mm lens. More recently, I’ve been using a 100-400mm. This is harder because, at 400mm, it’s difficult to see enough of the sea to find the best waves. I’m enjoying the challenge. Long focal lengths offer a way to create difference. The casual viewer will see the big scene, but they won’t notice the curious textures within a wave. For this kind of work, you have to compose like a photographer of abstracts, thinking only of shape and colour, rather than the subject as a whole.

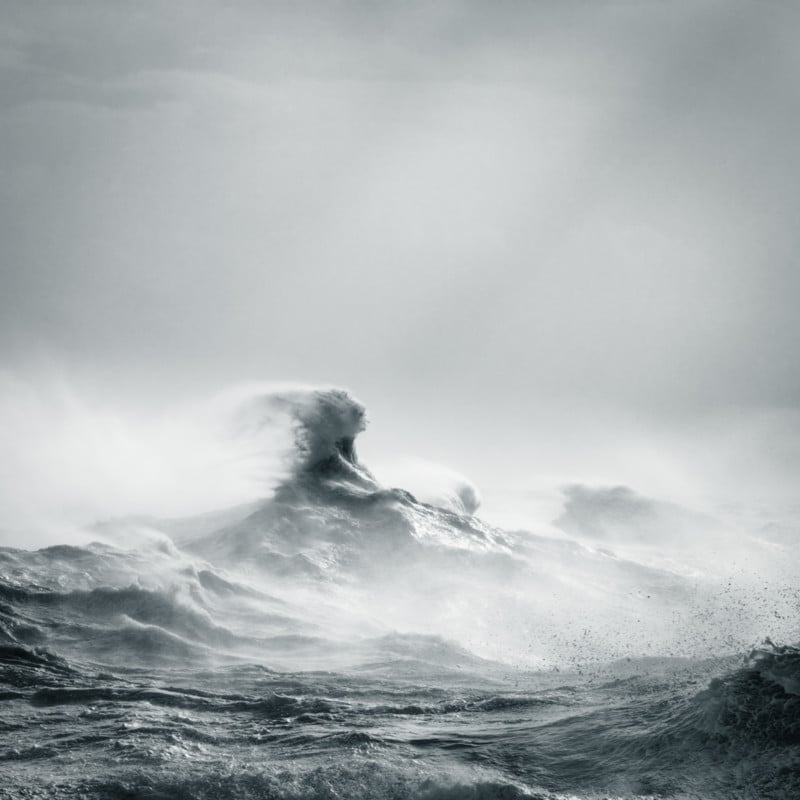
So far, I’ve concentrated on waves alone but waves as they break against the shore also make exciting subjects, stirring our imagination with awe and even fear. As these photographs tend to reference scale and location, they are often more documentary in style; however, that’s not always the case. I happened to publish my photograph, “Face-of” during the voting for the U.S. presidential election. This was entirely coincidental (I’m British), but several people commented that the picture represented the clash of candidates and ideologies! People will always find metaphors in the sea.

I’ve outlined just a few of the possible ways to photograph waves. As with any subject, the best approach is to be open-minded and willing to experiment. Try everything and see what happens, then make changes based on your experience. Be prepared to make a lot of bad photos (remember, this is more like sports than landscape photography). Above all, make sure you take time to just watch and listen to the waves. The sea’s music is beautiful and inspiring and I firmly believe you will make better art if you let it into your soul.

Safety

I don’t want to spoil the flow of the article with a homily on safety but I feel it would be irresponsible not to mention it at all. Waves can be dangerous. It’s important that you know the relevant tides, wind direction and speed. Working on a falling tide is safest. If it’s not safe to get as close to the waves as you would like, come back another day with a longer lens. Trust your instincts – if you feel at risk, you probably are. Lens hoods are good for keeping spray off the lens and I recommend that you always wipe everything down with fresh water after you leave the beach.


**The article is courtesy ofELEMENTS Magazine. **ELEMENTS is the new monthly magazine dedicated to the finest landscape photography, insightful editorials, and fluid, clean design. Inside you will find exclusive and in-depth articles and imagery by the best landscape photographers in the world such as Freeman Patterson, Bruce Barnbaum, Rachael Talibart, Charles Cramer, Hans Strand, Erin Babnik, and Tony Hewitt, to name a few. Use the PETAPIXEL10 code for a 10% discount off the annual subscription.


About the author: Rachael Talibart is a professional seascape and coastal photographer. Her critically acclaimed photographs of the ocean and coast have been featured in the press all over the world. Rachael is represented by galleries in Europe and the USA, her work is frequently exhibited and her limited-edition prints are collected internationally. She is the author of three monographs, including ‘Sirens’ and, most recently, Tides and Tempests. Rachael owns f11 Workshops, providing location and online photography training and she leads international photography tours for Ocean Capture. You will find Rachael Talibart’s series “Oceans and Odysseys” in the ELEMENTS Magazine.

#editorial #tips #travel #abstractlandscapephotography #abstractlandscapes #elements #elementsmagazine #fineart #fineartlandscapephotography #fineartphotography #landscapephotographer #landscapephotography #oceans #rachaeltalibart #waves
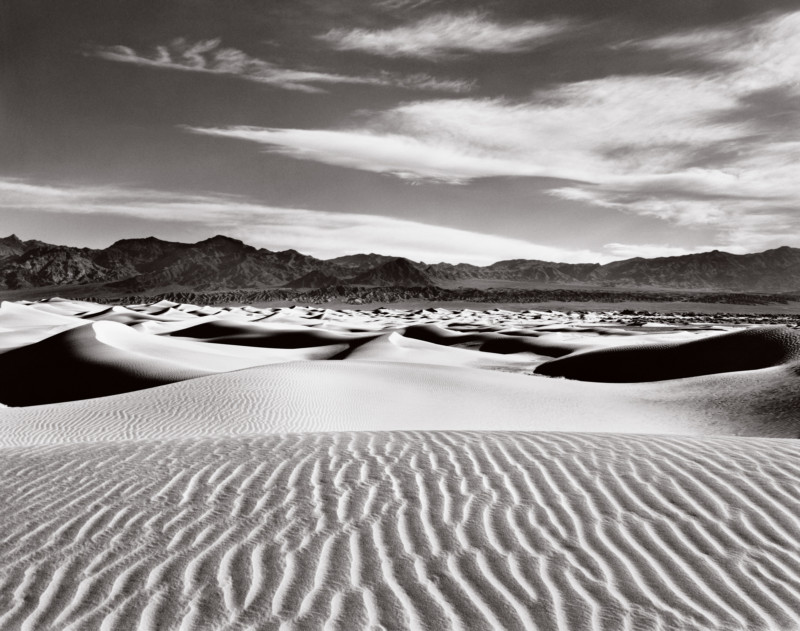