#tips

danie10@squeet.me

The Watch Command in Linux can refresh a CLI command repeatedly for you

Bild/Foto
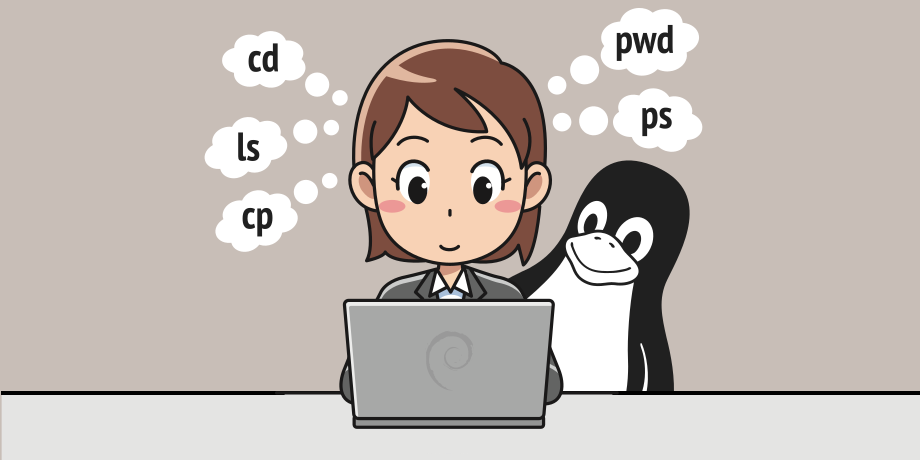
Sometimes, while working on the Linux command line, you might want to execute a command repeatedly so as to track any change in output. Luckily, there is a command-line utility that lets you do this.

With the Linux watch command, you can track the changes in the output from time to time (and adjust the interval). It is beneficial for reflecting the real-time view of events that are happening on an operating system.

See https://linuxiac.com/linux-watch-command/

#technology #linux #opensource #tips #cli
#Blog, ##cli, ##linux, ##opensource, ##technology, ##tips

danie10@squeet.me

Pacman Commands Cheat Sheet for Arch Linux

Bild/Foto
Linux tips

One uniqueness or key identifier of different Linux distributions is in the package manager they use to update, install, configure, and uninstall various targeted software packages. In Arch Linux, the package manager is called Pacman.

This tutorial seeks to walk you through some commonly used and unique Pacman commands that will make your Arch Linux interaction and experience easier and much more memorable.

It is highly advisable to be a root user or have Sudoer user privileges on your Arch Linux system to fully benefit from what the Pacman command has to offer.

See https://www.linuxshelltips.com/archlinux-pacman-cheatsheet/

#tips #Linux #technology #cheatsheet
Bild/Foto
#Blog, #linux, #technology

danie10@squeet.me

Use a SSH Config File to Manage SSH Connections to Various Remote Servers (or Pi’s) instead of remembering IP addresses, ports, etc

Bild/FotoBild/Foto
Using SSH profiles can help you in cases where you regularly connect to various servers (especially if you’ve added custom SSH ports to the mix too). No need to remember the IP address and other such details for SSH connection.

So once you’ve configured this config file in ~/.ssh all you need to login is something like ‘ssh webserver’ or ‘ssh omv-server’. It won’t remember passwords, but if you have set up public key access, you won’t need any password to login.

This is on my todo list now as I have two servers and two Raspberry Pi’s that I log into quite regularly, and every time it is a check for the IP address, correct user name, password, etc.

See https://linuxhandbook.com/ssh-config-file/

#technology #security #Linux #SSH #tips
Bild/Foto
#Blog, #linux, #security, #ssh, #technology, #tips

digit@joindiaspora.com

methinks this off-the-cuff comment deserves pasting as its own post.
might be some #good #health #tips for you, to add to your daily practices. :)
be well, everybody. :) #wellbeing to you all. :)

(forgive my typos and spelling mistakes. like i say, twas just hastely off-the-cuff rattled out quick, in one go (and without spellchecker). pasting pretty-much as is (moving the hashtag to comment though, not wanting to muddy or water-down in noise.)


The flu numbers are way down this year due to precautions against COVID.

and misreporting.

I’m going to do everything I can to lower risk and mitigate effects because I can’t afford any more loss of pay.

and you think the booster will accomplish that (rather than the inverse)?

or… what else are you doing?

  • megadosing vitamin D3?

  • zinc in a bioavailable form?

  • ample all other vitamins (A, C, Es, Bs, Ks…) and minerals and nutrition?

  • ample adequate sleep for melatonin?

  • light therapies (infra-red, ultr-aviolet, sun-mimmicking, etc)?

  • sound therapies (binaural solfeggio isochronic rife entrainment n relaxation music, 432hz, 528hz, etc)?

  • breathing techniques (wim hof method’s breathing technique, calm awareness of breath, deep breathing, breath of fire, alternate nostril breathing, etc)?

  • other augmentary supplements (NAC, stamets’ 7 (reishi, lionsmane musroom, turkey tail mushroom, cordiceps, (i forget the other two)), ashvagandha, amla, triphala, amino-acids, phyto-cannabinoids (CBD, caryophyllene, d8-thc-c5, d9-thc-c5, d9-thc-c3, CBC, CBN, CBD-a, d8-thc-c5-a, d9-thc-c5-a, d9-thc-c3-a, CBG, CBG-a, etc), probiotics complex (with a high strain diversity count), beef liver extracts, cod-liver oil, etc?

  • yoga?

  • exersize?

  • sun exposure?

  • endorphin practices like watching comedy?

  • oxytocin activities like socialising or time spent petting animals?

  • reading scientific papers to get a broader view than is presented in the corrupt kleptarch criminal corporate monopoly mono-perspective propaganda media?

  • anything else, that’s not a lucrative scam to transfer more wealth and power (to those who already have an imbalanced excess), that wont impare your immune system and make you perpetually dependent and trackable? XD

  • following research trails as to the motives and who benefits and when what was planned (to find out things like “COVID 19” was appearing in government planning documents at least as early as 2015, that, as one middling insider leaked “when the terrorist thing wears off, we’re going to have people running scared of a disease without symptoms”, the "patentgate" string of patent frauds on the sars-cov-2 virus as far back as 2002 (highlilghting that they had this planned for the next stage, at least as far back as then!), … and many more smoking guns, and reveals of the man behind the curtain. … the emperor wears no clothes!)

petapixel@xn--y9azesw6bu.xn--y9a3aq

Tips for Capturing Humanity in Street Photos

image

A woman licking a stick while looking at a man

Henri Cartier-Bresson, the "father of street photography," believed that the mission of the photographer was to patiently and deliberately wait with camera in hand for that unique instant that will never again be repeated. He identified this time as the photographer’s Decisive Moment.

A woman holding a child in a carrier on her chest

Whenever a photographer travels, taking a picture of the Eiffel Tower or Saint Peter’s is obviously a must. However, the true joy is to capture a Parisian or Roman doing something that depicts a little slice of our universal humanity.

Kids playing at the edge of some water

The problem is how does one achieve this feat without causing a disturbance while still enjoying your day. It is fun going out with your photo friends for a day of shooting. However, once you arrive at your selected location, split up! Street photography is not a team sport.

It is difficult enough to remain invisible when one is alone. This is impossible to achieve walking down a street with a friend with two giant DSLRs. Whenever I go shooting with a friend, once we arrive at our location, we agree on a time and place to rendezvous, and we then diverge.

A cowboy kissing a woman

A girl sleeping on another girl's lap

While roaming the streets with a camera in hand, one must always be on the lookout for something interesting. When a possible scene is discovered, do not stare! Look away. Pretend to take a picture of something at a different angle. While doing so, adjust your aperture to the required f-stop, and also set your focusing dot to where you will need it for the desired shot. All that is needed now is a quiet turn to the subject and take several images on “quiet mode.”

A man and woman under umbrellas

At times during your travels, you simply have to trust your intuition. You may come across a promising character or group of people, but nothing of true interest is happening at that moment. Do not hesitate to just hang around at a modest distance and see what develops. Many times your instinct will prove worthwhile, and you will be rewarded with something unique.

A woman sitting on a bench and looking to the side

When children are concerned, the photographer must obviously exercise more caution. In a festive atmosphere, such as a fair, parents are usually much more relaxed.

If you can spot the parent of an interesting child, simply approach the parent with a smile and explain that you are a serious photographer trying to document the occasion. Be honest and tell them you would love to photograph the child. I usually also volunteer to send them a photo if it turns out successful. Usually this is all that is needed.

A little girl chasing birds

In the average situation on the street, more caution is needed. If the street is crowded, and you are at a moderate distance from the subject, begin to take photos in a circular motion, and when the angle is right, capture the image you want. Afterwards, continue with your circular shooting. If someone says anything, smile and explain you are a serious photographer documenting life in the city.

Two women taking a selfie together

Shooting parents with children is considerably much easier. Just approach with a smile and show them the camera -- you will typically get a nod. If questioned, simply have a story prepared. You are a serious photographer from the local camera club, and you are documenting life in the city. Afterwards again approach the parent, thank them, and offer to send them a photo.

A man lying down to photograph a child

Two children under an umbrella

Two children blowing bubbles

During your walks, look for the unusual, the different, and the strange. Some of the most enjoyable images of the street are slightly funny, peculiar, or ironic.

A man with face paint making a face

A man wearing Japanese samurai armor crouching to shoot a photo with a camera

A little girl smiles while women around her pray

Love is always an interesting subject. From a photographer’s point of view, this makes taking a candid image so much easier. The couples are usually so involved with each other, that they simply do not notice you or your camera.

A woman wearing a mask and standing in front of a man

A couple sleeping on a subway car

Sometimes it is just the color or combinations of colors that make a photo. I generally choose to process in monochrome, but occasionally it is all about color.

Two restaurant workers inside the open doors of a restaurant

Two women posing for a selfie

Reflections are a challenge. Focusing is a little tricky, but sometimes it is worth it.

A woman behind reflections in a window

A man behind reflections in a window

While you are involved in your search, do not only look at the street. Gaze into passing buildings, opened doors, and restaurants. Sometimes the best is not outside!

A woman sitting at a counter in a restaurant and looking at the camera

And sometimes you are rewarded with the truly bizarre.

A man photographing another man while monkeys are crawling on his back

A man wearing a Batman costume and mask

There are many ways for photographers to enjoy their cameras. Many enjoy the landscape, while others seek wildlife, and still others seek the intimacy of a portrait. For me, the challenge is to modestly try to follow in the footsteps of Henri Cartier-Bresson and strive to somehow capture some aspect of people simply being people. Henri used film, and we today use ones and zeros, but the goal is the same -- to create a portfolio for future generations to learn about their past.

An old lady holding a plate of food

A woman holding an umbrella in snowfall while shooting a photo

Finally, the untold enemy of a street photographer is being hesitant or too cautious. Try not to be tentative. You are not a wildlife photographer in fear of being eaten by a wild lion, nor are you a sports photographer about to be run over by a 230-pound halfback.

In the words of Alfred Eisenstaedt: “When I have a camera in my hand, I know no fear.”


About the author : Charles Levie is a photographer and math educator based in West Friendship, Maryland. The opinions expressed in this article are solely those of the author. You can find more of Levie's work on his website, Facebook, Flickr, and Instagram. This article was also published here.

#inspiration #tips #advice #charleslevie #decisivemoment #street #streetphotography #thedecisivemoment

f Roman 000
petapixel@xn--y9azesw6bu.xn--y9a3aq

Photographing Fog on Both Film and Digital

image

For photographers curious about using either film or digital to capture foggy landscape, Michael Shainblum has put together a video showing the behind-the-scenes of using both mediums with a telephoto lens.

Shainblum, a passionate landscape photographer and filmmaker, often switches between a wide-angle and a telephoto lens, depending on the subject at hand. He has shared in the past the different ways to use a telephoto lens for landscape work, such as when shooting minimalist scenes of sand dunes or when looking for compelling and unique shots in areas that have been photographed by many, such as Yosemite National Park.

This time, when Shainblum headed up the mountains to photograph the scenic views filled with fog, he took his Sony Alpha 1 with a Sigma 100-400mm zoom lens alongside a 35mm Nikon FE camera body loaded with a roll of Portra 400 film and also equipped with a telephoto lens.

Fog rolling through a valley at sunrise or sunset

The beauty (and the challenge) of photographing fog is that the scene in front of the camera continuously changes, revealing new opportunities for compositions. As the fog passes through the trees and as the light changes, no one frame will be the same as the previous one.

A foggy landscape by photographer Michael Shainblum

A foggy landscape by photographer Michael Shainblum

Similarly, a telephoto lens, if used from a good vantage point, gives numerous ways to capture the landscape, for example by zooming in on a pattern or a particular detail that a wide lens wouldn't reach.

A long exposure photo of fogLong exposure creates soft blur in the fog

When photographing in foggy conditions, photographers have the choice of shooting shorter exposures to capture the texture of the fog or opting for a longer one that blurs out and softens its movement. During his trip, Shainblum experimented with both and also added his film camera to the mix to capture the exact same scene with both cameras.

A foggy landscape photoTaken with Nikon FE A foggy landscape photoTaken with Sony Alpha 1

Although the results delivered from both digital and film are different, the subjective preference of the medium is down to the photographer themselves. All in all, for Shainblum, the experience of photographing fog can be therapeutic, whether it is shot with a film or digital camera.

A foggy landscape by photographer Michael ShainblumTaken with Nikon FE A foggy landscape by photographer Michael ShainblumTaken with Sony Alpha 1

In fact, although Shainblum usually has his camera with him, there are plenty of times where the soothing experience of simply watching the changing landscape can be more than enough.

More of Shainblum’s educational and inspirational videos can be viewed on his YouTube and his photographic and video work can be found on his website and Instagram.


Image credits: All images by Michael Shainblum and used with permission.

#inspiration #tips #travel #35mm #analog #film #filmphotographers #filmphotography #fog #landscape #landscapehotography #landscapephotographer #michaelshainblum #sonyalpha1

isaackuo@pluspora.com

Multi-Column Streams in diaspora, Tumblr, Mastodon, Facebook, and MeWe

I've now added a new MeWe Multi-Column userstyle, and refined Mastodon to support non-advanced web interface mode.

1) click userstyle here: https://userstyles.world/user/isaackuo

2) click on green GET STYLUS button to install Stylus plugin

3) click on blue INSTALL button to install the userstyle

For diaspora and Mastodon, edit the userstyle to add your pod to the URL domains it applies to (click on S plugin icon, select Manage ... )

For Mastodon, try "advanced web interface" to see if it works better for you.

#diaspora #tumblr #mastodon #facebook #mewe #pluspora #tips #tip #diasporatips

If you have already used my Multi-Column userstyles, consider re-installing them from https://userstyles.world/user/isaackuo because that way you'll get automatic updates when I update them. For a while, I hadn't figured out how to get my updates to propagate properly, but I've figured it out now. I have to manually alter the version number before publishing the update.

isaackuo@pluspora.com

G+ style Multi-Column Streams in diaspora, Tumblr, Mastodon, and Facebook

I've moved over my Multi-Column userstyles to the Stylus repository at userstylesDOTworld *

https://userstyles.world/user/isaackuo

I’ve put together CSS styles which provide multi-column Streams in various social media platforms. This has a huge effect on browsing speed. To use them, you:

1) Download Stylus plugin (Chrome, Firefox or Opera): https://add0n.com/stylus.html

2) Install desired Multi-Column styles from here: https://userstyles.world/user/isaackuo

Modify the domain it acts on if you’re using a different pod

Enjoy!

= = = = = ADDITIONAL NOTES = = = = =

diaspora is the most refined, with a lot of extra features like multicolumn comments, autoexpand all posts, font size customization, and other UI enhancements

Tumblr is also solid; it keeps the standard width of Tumblr posts and is responsive to width (2 or 3 or 5 columns)

Mastodon is maybe 95% good, depending on how you prefer to use Mastodon. It's designed for use with the "Advanced" view.

Facebook is a bit crude, but I'm proud that I was finally able to crack its CSS well enough

Of these platforms, the only ones I use significantly are diaspora, Tumblr, and Mastodon. Those will be the best supported, naturally.

#diaspora #tumblr #mastodon #facebook #pluspora #tips #tip #diasporatips

Note, the old site is the repository for Stylish, which Stylus was forked from. Stylish reports site usage data back to the mothership, whereas Stylus does not. Old site is here: https://userstyles.org/users/773238

petapixel@xn--y9azesw6bu.xn--y9a3aq

How to Photograph Couples With Height Difference

image

I am a professional wedding, portrait, and fashion photographer and have been photographing couples for nearly three decades and I have been teaching photography for over twenty years. I recently published a brand new video tutorial with tips on how to pose couples that have a big height difference.

When it comes to photographing a couple that is noticeably different height-wise, you can end up with images that accidentally accentuate this fact. And that can affect the overall composition.

It’s not that we’re trying to hide the fact that one partner is taller than the other. But we’re just trying to make it more aesthetically pleasing and not have it become a distracting element in your portrait.

One way to do that is to have the taller subject take a very wide stance with a two-foot gap (or more) between their feet. It forces the taller subject to drop down in height by a couple of inches. The key to this pose, though, is to have the subjects turn so that you cannot see the part between the taller subject’s legs.

Another common pose is to have the taller subject standing behind the shorter one with arms around the waist. Posing the taller subject with a wide stance will also work in this same situation. But again, the key is to make sure the camera cannot see the part between the taller subject’s legs. You can, of course, have the taller subject squat down a bit. But that will become tiring very quickly if someone has to constantly pose in a slightly squatting position.

You can also have the shorter subject stand nice and tall while the taller subject tilts their head towards the shorter one. It’s a subtle difference but helps to close that gap and also communicates a closeness between the two subjects.

There’s also a trick that you can use, especially if you are in a situation when you cannot pose a couple. For example, when they are walking down the aisle, or during a candid moment. If you tilt the camera in the direction of the taller subject, then it creates the illusion that the height difference is not quite as severe. This could be difficult if you are in a scene where there are strong horizontal or vertical lines in your composition.

Another great tip is to use whatever is in your environment to balance the height difference. For example, you can use a chair or a park bench or some other object where the taller subject can be seated while the shorter subject is standing. You can also use everyday objects such as the curb on a street, a staircase, or a natural incline on a hill to make the shorter subject stand a bit taller.


About the author: Widely regarded as one of the top five wedding photographers in the world, Jerry Ghionis’ theatrical and iconic images have redefined modern wedding photography. In 2013, he was named as a United States Nikon Ambassador. And he was the first Australian named in the first-ever list of Top Ten Wedding Photographers in the World by American Photo magazine. Jerry was also named as the Australian Wedding Photographer of the Year by the AIPP. Jerry is also proud to have won the WPPI (Wedding & Portrait Photographers International) Wedding Album of the Year for a record eight times among his long list of accolades and WPPI included Jerry in their Top Five Wedding Photographers in the World. In 2011, Jerry was also named by PDN magazine as one of the top photography workshop instructors in the world. To learn more from Jerry, visit his website.

#educational #tips #couples #couplesportraits #differentheights #height #howto #jerryghionis #portraits #tricks

petapixel@xn--y9azesw6bu.xn--y9a3aq

Photographing Waves: One of The Most Rewarding Subjects

image

Waves are some of the most rewarding subjects for photography that I know. For starters, if you miss one, another will be along very soon! Of course, they are also unpredictable and can be dangerous. What is fascinating is that no single wave will be exactly the same as any other wave that has existed since the beginning of time. Mind-blowing stuff.

When you’re starting out in wave photography, it is helpful to have a rudimentary understanding of different types of waves and what you’re likely to encounter on different beaches. Wide beaches with shallow falls typically experience long, rolling breakers. These graceful waves are a pleasure to photograph. The curl of a rolling wave is attractive but this perspective can be elusive as the topography of the coast often fails to offer a side-on angle.


This story is brought to you byELEMENTS Magazine. ELEMENTS is the new monthly magazine dedicated to the finest landscape photography, insightful editorials and fluid, clean design. Use the PETAPIXEL10 code for a 10% discount off the annual subscription.


Some photographers take to the water with waterproof camera housings and capture amazing moments within or even underneath waves (although not on the beaches where I make photos!). Obviously, this approach is for confident swimmers and, if you want to try it out, I strongly recommend that you first spend time getting to know your location and how to navigate the waves there safely. However, if it isn’t safe to swim or you’d simply prefer to stay on terra firma, don’t give up just because you can’t access the popular “curl.” A front-on perspective can also work; the moment a breaker starts to drop is often all that’s needed to break the line and add visual interest.

On steeper, narrower beaches, there may be backwash. This is when water that has travelled up the beach falls back with enough power that, when it meets another wave, the water is pushed upwards, creating a wall. This is a marvellous subject and you can go wide to show the impact in its setting or zoom in tight to explore the textures. “Clapotis” is a sort of backwash wave. This lovely French word describes the moment that a wave, having bounced off a quay or cliff, crashes into another wave. The shapes often seem to defy gravity. This sort of photography is more like sports or wildlife than landscape work. Fast shutter speeds, responsive focusing and quick reflexes are the order of the day. I suggest you use high-speed continuous or burst mode and run off 3 or four frames for each wave.

As with everything, it pays to know your location and to have done your research. For example, if the wind is blowing from the north, there’s little point in visiting a south-facing beach backed by cliffs. However, if the land behind the beach is flat, a strong offshore wind may be ideal as it will hold back the waves, making them pile higher, and you’ll get spindrift off the top. Equally, think about the tide and the light. There are usually fewer waves at low tide. Harsh midday sun is difficult, and you’ll likely need a polariser to mitigate the shiny patches of water whereas backlit waves can be gorgeous when the sun is low.

Point of view makes all the difference and there are so many variations on the standard, head-height position. If you can get low, your waves will stand proud of the horizon. Not every beach gets big waves, but they all get waves of some sort, even if just from the wake of passing vessels. If you lie on the beach, even small waves can look mighty.

Alternatively, try a higher point of view, a clifftop perhaps. Photos taken from above are no longer about the size of the waves. Instead, they make the pattern the star of the show. Waves leave in their wake wonderful shapes that we never see from beach level. Next time you watch the sea from a cliff, notice the beauty of a wave’s footprint.

The sea is always moving so shutter speed is probably your biggest decision; 1/800 or faster will freeze the waves, capturing all the detail. However, slower shutter speeds are also hugely enjoyable. I particularly like ¼” as it keeps the wave’s overall shape, but the details seem like brushstrokes. In my photos, “Theia” and “Twist,” the waves are the same basic shape, but one is caught at 1/800 and one at ¼”. While we’re experimenting, how about adding some intentional camera movement. I like shutter speeds close to 1” and subtle movement so that I can still see the idea of a wave within the blur. I prefer not to use a tripod for ICM. I’m not looking for perfection here – I want the result to look like a painting and paintings aren’t perfect, at least the good ones aren’t.

If you’ve ever tried to photograph waves and been disappointed, I suggest you try a longer focal length. It will suck the viewer into the action and the wave will almost certainly look more exciting. Most of my storm waves were captured using a 70-200mm lens. More recently, I’ve been using a 100-400mm. This is harder because, at 400mm, it’s difficult to see enough of the sea to find the best waves. I’m enjoying the challenge. Long focal lengths offer a way to create difference. The casual viewer will see the big scene, but they won’t notice the curious textures within a wave. For this kind of work, you have to compose like a photographer of abstracts, thinking only of shape and colour, rather than the subject as a whole.

So far, I’ve concentrated on waves alone but waves as they break against the shore also make exciting subjects, stirring our imagination with awe and even fear. As these photographs tend to reference scale and location, they are often more documentary in style; however, that’s not always the case. I happened to publish my photograph, “Face-of” during the voting for the U.S. presidential election. This was entirely coincidental (I’m British), but several people commented that the picture represented the clash of candidates and ideologies! People will always find metaphors in the sea.

I’ve outlined just a few of the possible ways to photograph waves. As with any subject, the best approach is to be open-minded and willing to experiment. Try everything and see what happens, then make changes based on your experience. Be prepared to make a lot of bad photos (remember, this is more like sports than landscape photography). Above all, make sure you take time to just watch and listen to the waves. The sea’s music is beautiful and inspiring and I firmly believe you will make better art if you let it into your soul.

Safety

I don’t want to spoil the flow of the article with a homily on safety but I feel it would be irresponsible not to mention it at all. Waves can be dangerous. It’s important that you know the relevant tides, wind direction and speed. Working on a falling tide is safest. If it’s not safe to get as close to the waves as you would like, come back another day with a longer lens. Trust your instincts – if you feel at risk, you probably are. Lens hoods are good for keeping spray off the lens and I recommend that you always wipe everything down with fresh water after you leave the beach.


**The article is courtesy ofELEMENTS Magazine. **ELEMENTS is the new monthly magazine dedicated to the finest landscape photography, insightful editorials, and fluid, clean design. Inside you will find exclusive and in-depth articles and imagery by the best landscape photographers in the world such as Freeman Patterson, Bruce Barnbaum, Rachael Talibart, Charles Cramer, Hans Strand, Erin Babnik, and Tony Hewitt, to name a few. Use the PETAPIXEL10 code for a 10% discount off the annual subscription.


About the author: Rachael Talibart is a professional seascape and coastal photographer. Her critically acclaimed photographs of the ocean and coast have been featured in the press all over the world. Rachael is represented by galleries in Europe and the USA, her work is frequently exhibited and her limited-edition prints are collected internationally. She is the author of three monographs, including ‘Sirens’ and, most recently, Tides and Tempests. Rachael owns f11 Workshops, providing location and online photography training and she leads international photography tours for Ocean Capture. You will find Rachael Talibart’s series “Oceans and Odysseys” in the ELEMENTS Magazine.

#editorial #tips #travel #abstractlandscapephotography #abstractlandscapes #elements #elementsmagazine #fineart #fineartlandscapephotography #fineartphotography #landscapephotographer #landscapephotography #oceans #rachaeltalibart #waves

petapixel@xn--y9azesw6bu.xn--y9a3aq

How to Try Deep Space Astrophotography Without Spending a Fortune

image

Are you a photographer who would love to give deep space imaging a try – but you’re not quite ready to spend thousands of dollars (or more) to build your own astrophotography rig? With remote astrophotography, you can create astonishing images without the high startup costs. You can learn how to capture and process images using high-end telescopes located all over the world.

Even if you have your own gear, remote technology can supplement what you already have. For example, you could improve your processing skills, capture images without light pollution, try out a variety of equipment options, or capture images from a different location or even hemisphere.

TelescopeGuide recently published a guide to getting started with remote astrophotography. It includes a summary of the best online service providers and a step-by-step walkthrough of how to use Insight Observatory’s remote telescope service. Be sure to check it out, or keep reading below for an introduction (adapted from TelescopeGuide’s original).

Why Consider Remote Astrophotography?

There is something uniquely satisfying about using your own equipment and software (plus some patience and skill) to capture a stunning image of a galaxy or nebula in deep space. However, as amazing as it feels to do astrophotography on your own, it's also a hobby that can get, well, expensive.

NGC 5194 (The Whirlpool Galaxy, a.k.a. Messier 51; Taken with Insight Observatory's ATEO-1 Remote Telescope; 20 Minutes Total Exposure Time

First, the best celestial images require a high-end apochromatic refractor telescope or a fine-tuned astrograph reflector with precision-built optics. Second, in addition to the telescope for astrophotography itself, you'll need a smooth computerized mount capable of being auto-guided with the help of a secondary guide scope. Third, you'll need a suitable camera and several other accessories -- for example, a dew control system, filters, reducers, field flatteners, correctors, et cetera.

Finally, you'll need a place to set up your equipment. While you can certainly do deep space imaging in your backyard, it takes time and effort each time you want to set everything up and you may need to contend with light pollution or sky conditions, which can make things more challenging.

Also, one last thing: Even if you have excellent gear and a great place for imaging, your particular combination of equipment, location, and hemisphere will always limit what you can capture.

So, regardless of your situation, adding a remote option to your toolkit can help expand the imaging choices available to you.

So, How Does It Work?

With remote astrophotography, you collect your image data using a telescope set up in a remote location.

Insight Observatory’s ATEO-1 Remote Telescope with Image of The Horsehead Nebula

An observatory, usually located in a dark-sky location (whether an official IDA site or just a remote location with a very dark sky), houses the rig. The observatory allows electronic control of its roof, so you can remove it anytime for operation without anyone physically onsite at the observatory.

Here is how it works:

  • First, you submit an image request to the service provider, specifying your target and any other details required for capturing the image data.
  • Next, the computer-controlled equipment collects the requested exposures and sends you a file containing the raw (unprocessed) image data.
  • Finally, you use image processing software to “stack” and process your images to produce the final result.

A Great Way for Beginners to Experiment with Astrophotography

For beginners, remote astrophotography offers a great way to get started and learn some of the basics of imaging objects in deep space. You can focus your energy and initial learning on understanding the overall process, figuring out the optimal exposure settings, and converting the raw data into beautiful final images.

Sometimes people who are learning astrophotography spend a lot of time and money on equipment and capturing raw images, but they don’t spend as much time learning and perfecting the back-end of the process where the image “comes to life."

With remote astrophotography, you can learn the entire process before investing in equipment, or you can do a mixture -- use your own equipment while also experimenting with remote imaging so you can compare and optimize results.

But It’s Not Just for Beginners!

If you’re a more experienced astrophotographer, you can still take advantage of the benefits of remote astrophotography:

  • Practice and refine your processing skills with a wider variety of targets, conditions, and equipment.
  • Use higher-end equipment when you want to create an especially spectacular image.
  • Capture images from a different location or hemisphere.
  • If you’re crunched for time, take images without setting up the equipment.
  • If you have poor local sky or weather conditions, you can take images any time by choosing a location with better conditions since you are no longer limited to imaging only when local conditions are good.

How Do You Get Started?

To learn more, check out TelescopeGuide’s guide to getting started with remote astrophotography, which includes the following:

  • What are the best options for remote astrophotography? A summary of the top providers including Insight Observatory, iTelescope, Telescope Live, and more.
  • Step-by-step guide: A walk-through using Insight Observatory's ATEO-1 online 16″ f/3.7 astrograph reflector for astrophotography.

Whether you’re a beginner looking to learn the end-to-end process of capturing celestial images, or an experienced pro looking to hone your skills, remote astrophotography offers a great way to take your photography to the next level and expand your imaging possibilities.


About the author: Brian Taylor is a technology professional by day, amateur astronomer by night, and writes at TelescopeGuide. He loves exploring the wonder and beauty of the universe—and (especially) sharing it with others. The above article was adapted from its original, published at TelescopeGuide.

#editorial #educational #tips #tutorials #astrophotography #briantaylor #galaxy #howto #insightobservatory #nebula #remote #remotephotography #space #spacephotography #telescopeguide

danie10@squeet.me

20 Basic Linux Commands for Beginners Explained with Examples: Bookmark It If You Only Visit The Command Line Occasionally

Are you new to Linux? Here all the list of basic Linux commands contains all the common commands you’ll need to know to get you started.

When dealing with Linux, you need to use a shell – an interface that gives you access to the operating system. The commands are required as inputs to inform or direct a computer program to perform a specific operation. While most Linux distributions are user-friendly and come with an easy to use graphical interface, knowing how to use the command line can be very useful.

For example, I still use 'du' quite often as it is way faster to determine space hogs from the command line on a remote VPS or server that using any GUI package. Some things are just better on a command line.

See 20 Basic Linux Commands for Beginners Explained with Examples

#technology #linux #commandline #tips

Image/photo

Are you new to Linux? Here all the list of basic Linux commands contains all the common commands you’ll need to know to get you started.


https://gadgeteer.co.za/20-basic-linux-commands-beginners-explained-examples-bookmark-it-if-you-only-visit-command-line

petapixel@xn--y9azesw6bu.xn--y9a3aq

How to Use Street Lights to Improve Your Night Street Photography

image

Nighttime street and urban photography can actually be easy. Street lamps (your ready-made light sources), can effectively provide all the light you need for your photos. The illumination gives you compositional ideas and options for taking great shots.

So how can you use street lamps in your photos?

Let's get into it.

Why Street Lights

Most of us have a best friend. However, they generally are not with us when we are out shooting night street photography. This is actually a good thing because one, they will probably distract you; and two, your current best friend is about to be replaced with a new best friend: the streetlamp.

The streetlamp is the fundamental element that will help you create beautiful night images. Without the streetlamp, there is no night street photography as the streets will be pitch black and there will be no light for the camera to make a decent exposure.

So the humble streetlamp does a few things:

1. It lights the source, allowing the whole lamp pole to become illuminated which can look atmospheric, depending on the locale.

2. It reflects light onto the surrounding area. This can create interesting highlights on a wall, a door, the pavement, the road, a person, etc.

3. It allows you to creatively compose your night street photography images. You can use a Pro-Mist Filter on your lens, which will create an atmospheric halation around the glow of the streetlamp. You can photograph a person entering the pool of light, surrounded by deep shadows. You can focus on the detail and texture that the streetlamp's illumination reflects on a wall or a building. If it is misty, streetlamps look extremely atmospheric, especially when they are trailing off into the distance. You can even use the streetlamp itself as the main element of the composition.

Camera Settings

The most important takeaway when photographing streetlamps and their reflected light is not to overexpose the image. Once the image is overexposed you are left with a clipped highlight in post-processing that cannot be recovered and therefore detail will be gone forever.

This is why I have learned to bracket my exposures when I am shooting Urban Night Photography.

When I am out in the field I have my brackets set to 2 stops underexposed / a correctly exposed shot / 2 stops overexposed. This way I have covered myself if there are any underexposed shadowy areas in my correctly exposed shot and any blown out window or street lights in the correctly exposed shot.

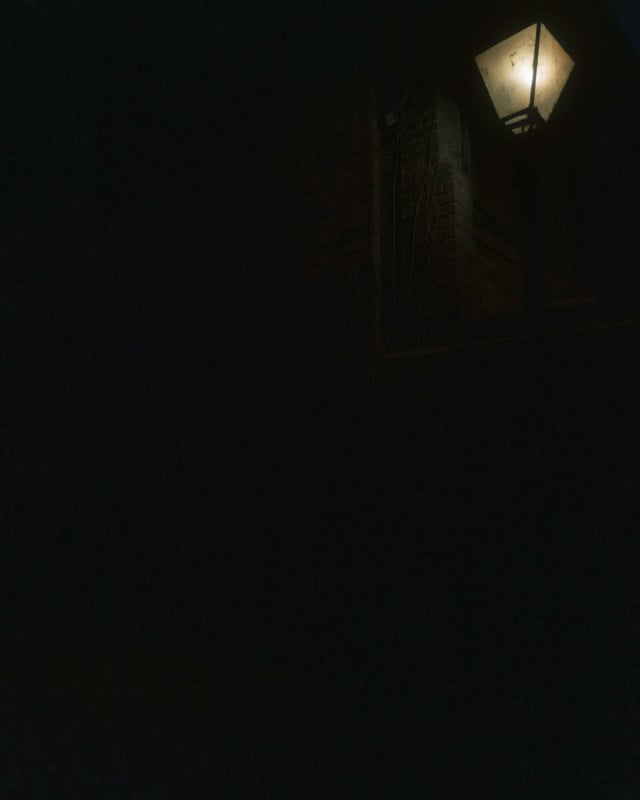
Later, in Photoshop, I will be able to blend in an underexposed shot, (where the streetlamp is exposed correctly), with a correctly exposed shot of the scene, (where the street lamp's light has been blown out). I layer the two shots together, using the well-exposed scene as my top layer, and gently brush in the perfectly exposed streetlamp from the underlying, underexposed layer.

When I shooting night street photography, I generally use a different process. I will check the location before I start photographing people and dial in the settings, check my histogram, and expose for the highlights, making sure that the histogram is not clipped on the right (blown out highlights) and adjust accordingly. Unfortunately, there may be deep shadows, but if I am shooting at an ISO value that doesn't go over my camera's ISO noise threshold then I know I can recover those shadows in Lightroom with either no noise penalty or having some acceptable noise, that I can choose to get rid of if I so desire.

Noise is not a problem as it does not affect the aesthetic pleasantry of the composition, or the Street Photography storytelling. However, an overblown highlight will, in most cases, ruin an image.

So, when it comes to night street photography settings, your histogram is your second best friend.

What to Look For

Illumination, shadows, textures, details, contrast, vibes, and highlights. These are the photographable elements that you can use in your Night street photography, to make your images stand out. Let's have a look at some of these.

Examples
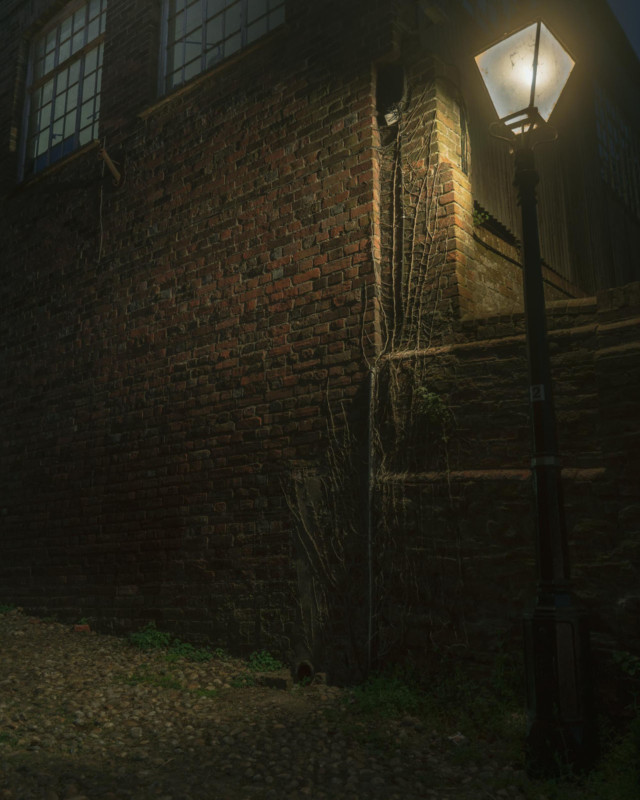
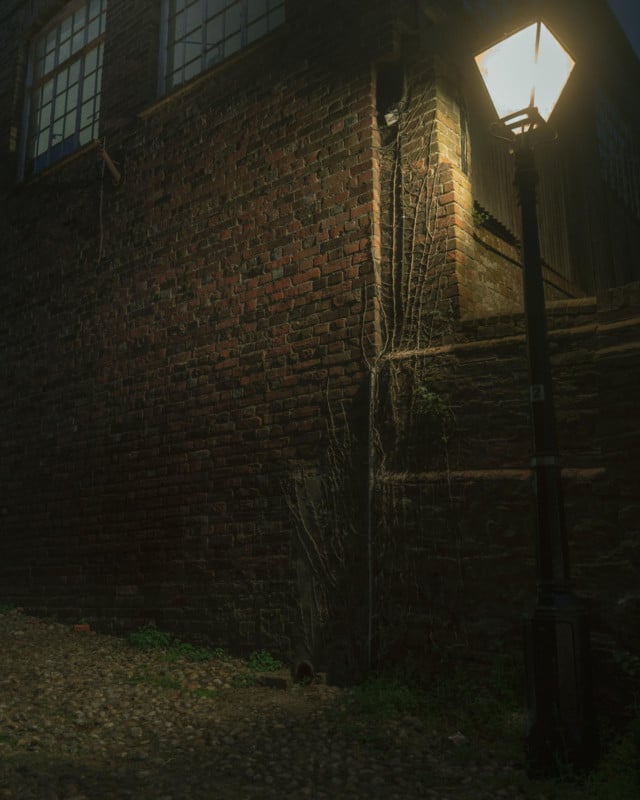
The final blended photo. Properly exposed for the scene. Underexposed for the street lamp.

I have been able to accentuate the details in this image because of the streetlamp reflecting on the wall and on the cobbled stone ground. Notice the beautiful highlights on the edges and the ridges of the wall and the detail on the withered foliage. Notice how subtly the highlights descend into Shadows. I blended exposures with an image exposed for the scene and an underexposed image which was for the lamp, that had the dirt detail that you can see on the lamp housing.
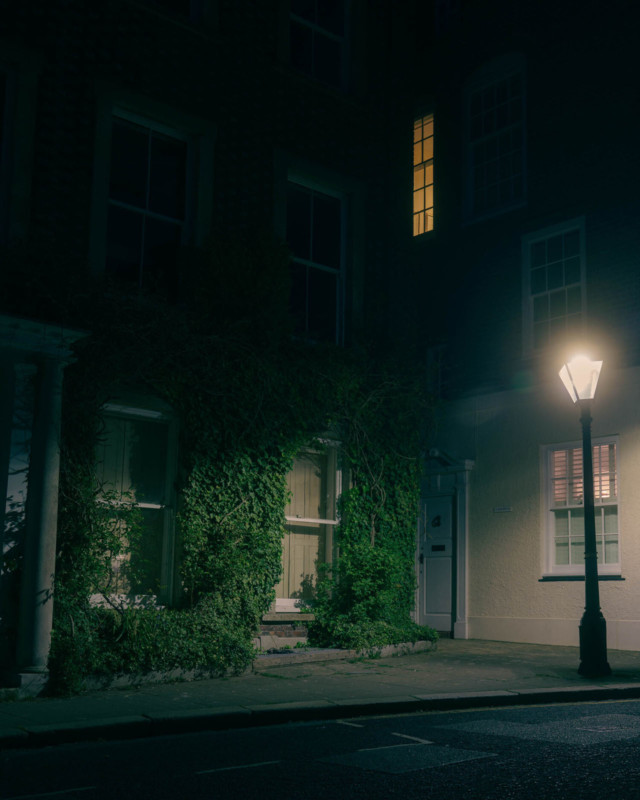
Windows and Dreams

This image works because the reflected lamplight reveals that this is in fact a building. Those two window lights are not reflecting much light at all. If the lamp wasn't on all you would see are two windows, which would look pointless. The lamplight compliments the eerie-looking window, providing gentle shadows around it. It creates a story and causes you to wonder, "Why is that the only light that is on up there? What is going on in that room?"
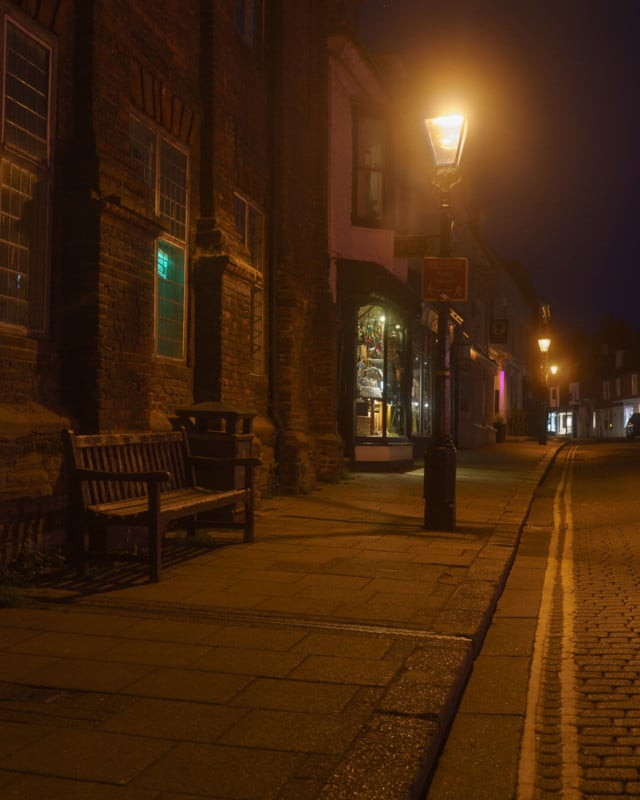
High Street Dreams

That beautiful glow halation around the lamp is due to the Tiffen Pro-Mist Filter which adds a certain amount of atmosphere to the lamp. In this image, the lamp is illuminating the pavement and roads which has allowed me to use the pavement and yellow markings as a leading line. Notice how the street lamp casts an interesting shadow beneath it, and how other streetlamps trail off into the distance, creating depth.
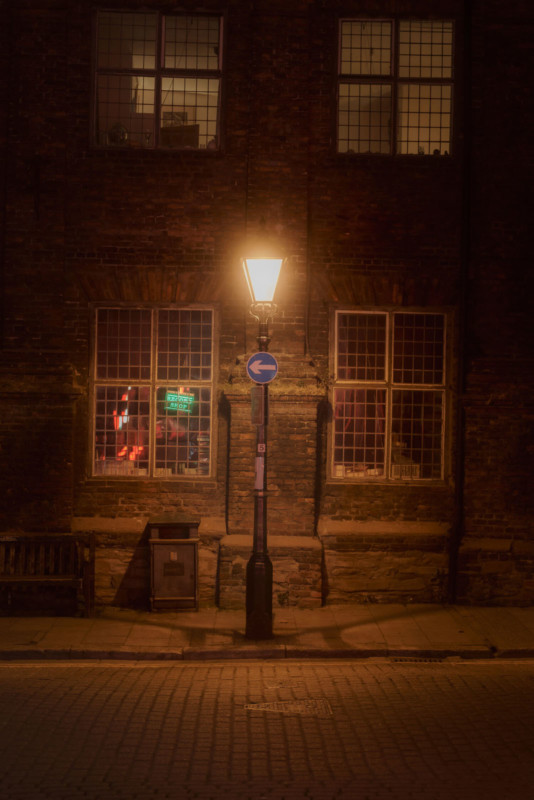
High Street Blues

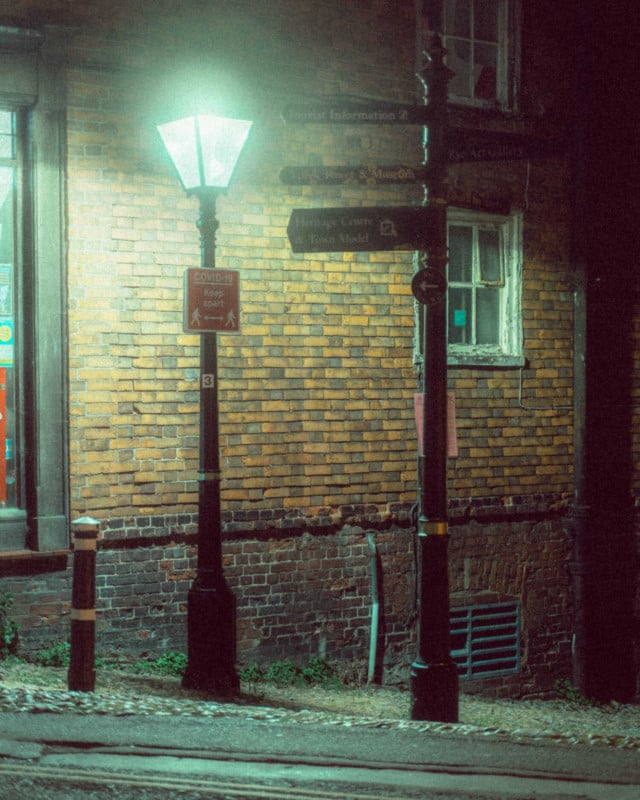
The main focus of this image is the streetlamp which, in the center of the shot, creates symmetry. It is also lighting up the detail on the wall and the pavement, creating visual interest and also casting beautiful shadows around the illuminated area. Imagine if the street lamp wasn't there. You would just see a bunch of windows. There would be no visual clues as to what the windows were a part of.
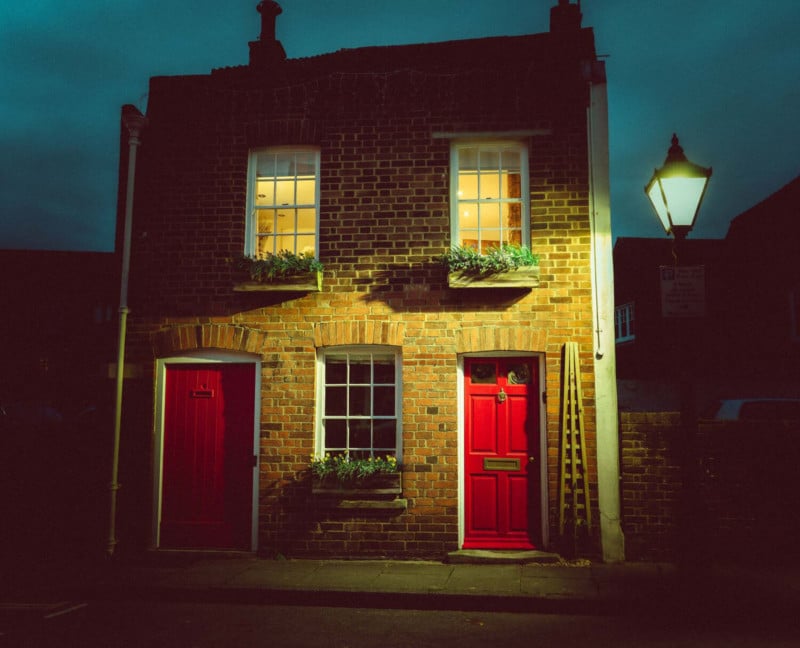
The House

This street lamp is beautifully lighting those red doors and also creating depth and form, as you can see shadow detail on the wall and behind the house. The streetlamp also provides an extra element of interest, revealing to the viewer that this is a street. Imagine if there was no lamp. The house would look flat and you could be left wondering if this interesting house was actually real.
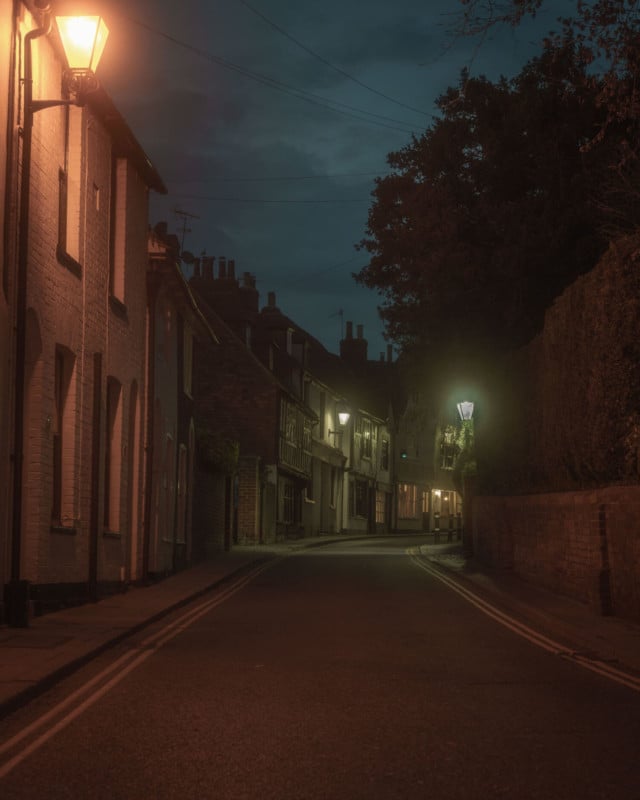
Mint Glows

If it wasn't for the mounted street lamp in the foreground then this image wouldn't work at all as the entire stretch of pavement would be in darkness, up to the next street lamp in the distance.
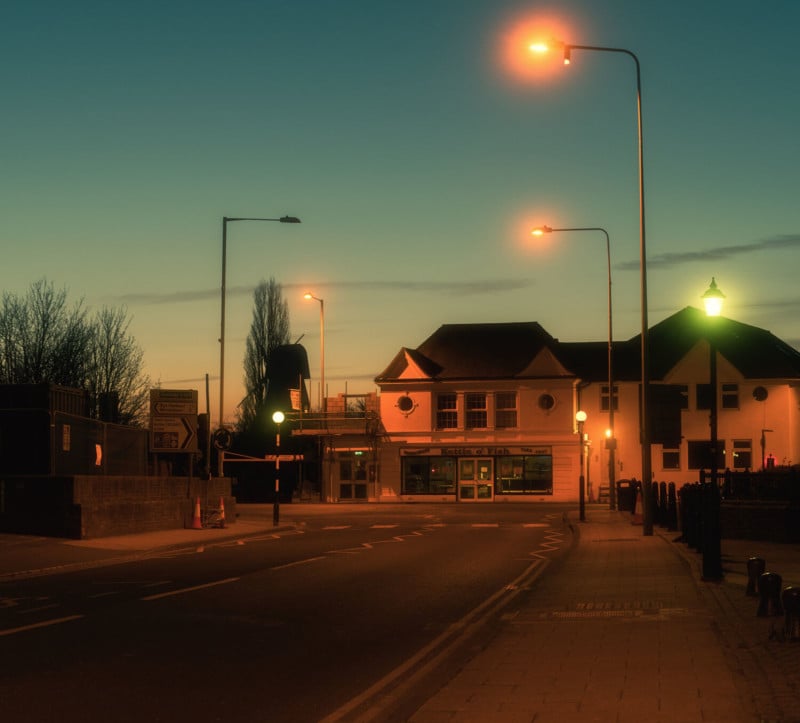
Chasing Dreams

The street lamps in this image are strangely colored which turns out to be a beautiful thing, as they add a lovely orange color contrast against the blue hour sky. That green lamp adds a further element of mystery to this colorful urban night street photography image.

While we pay our bills we will always have light, which means that we will be able to go out and shoot beautiful night Street and Urban photography.

Next time you are out at night, look for what the street lamp is illuminating (or is not) and see if there is some contrast that you can photograph or if there is a story to tell through visual imagery. This article has now got me quite emotional, so I'm off to hug my local friendly streetlamp.

Go forth and create.


About the author : Joe Redski is a fine art photographer and music lover based in the UK. The opinions expressed in this article are solely those of the author. You can find more of Redski's work on his website, Twitter, and Instagram. This article was also published here.

#inspiration #tips #tutorials #joeredski #lighting #night #nighttime #street #streetlights #streetphotography #urbanphotography

dredmorbius@joindiaspora.com

#Tips: Diaspora Limits Bangs!!!!!!!!!!!!

I'm not kidding!
Seriously!!
There is an upper limit!!!
No matter how many bangs you type in a row, only three will ever appear!!!!

(That last line has four bangs in a row in the source. The number displayed on Joindiaspora.com is 3.)

(And my title has twelve bangs in a row. Again, only three appear.)

I ... happened to notice this yesterday.

Other pods may differ, though I suspect this is systemwide / default!!!!!!!!!!!!

(Twelve bangs again.)

(For those Not In The Know, a "bang" (!) is also know as an "exclamation point".)

petapixel@xn--y9azesw6bu.xn--y9a3aq

Learn 21 One-Light Portrait Setups In Less Than Six Minutes

image

Sometimes photographers may be in a situation where they only have a single light source at their disposal during a portrait session. The good news is there are many ways you can use a single light to create unique and dramatic looks for portrait work as Dima Metkin demonstrates.

While some portrait photographers have become known for using a veritable boatload of lighting, oftentimes photographers can achieve incredible finished photos with just a little creativity and far fewer pieces of equipment.

In his sub-six-minute video, Metkin shows how to achieve 21 different styles with just a single light and a variety of accessories and modifiers, and includes lighting diagrams with settings for viewers to use as a detailed guide for themselves. The video has no voice-over tracks, no advertisements for sponsors, and is no-nonsense. Instead, Metkin just dives straight into a quick and concise guide on how to create the plethora of different and unique styles for portrait work using a single strobe. He goes quickly, so be prepared to pause and rewind when a particular style is worth studying.

The video starts with some very basic setups and then dives deeper into more complicated and interesting looks by adding more accessories and props, but all the while maintaining the use of just a single main light source. In short, the demonstration proves there is a lot that can be achieved with just one light.

Metkin begins with a traditional diffused portrait light at a 45-degree angle above and slightly to the side of his subject, shifts into a more directly lit positioning for the second setup, and after that breaks from the norm and tries different and interesting options. Some of the other setups he demonstrates include bouncing the light bare-bulbed into the ceiling to create a simulated daylight look, using v-flats to carve light for a little more dramatic beauty look, and even uses those same v-flats to block and bounce the light in unique shapes and patterns for rims and silhouettes. Metkin even goes so far as to show how to use an on-camera speedlight for a fashion-forward look, a flashlight to light-paint, and how to use various props like plant leaves and lawn chairs to create interesting shapes with shadows for more creative work.

For more from Dima Metkin, make sure to subscribe to his YouTube Channel.

#educational #inspiration #tips #dimametkin #lighting #lights #modifiers #onelight #photography #portrait #singlelight #youtube

petapixel@xn--y9azesw6bu.xn--y9a3aq

Photos of Bees, Our Helpful Insect

image

As you all know, bees help us put food on the table. Their pollination of California almonds alone has been valued at a billion dollars. They have also become my favorite photographic subject. I wrote about this last September.

In this article, I'd like to present a portfolio of some newer bee photos and comments about the bees and the process of photographing them.

In September I wrote about shooting with my Sony a6400 APS-C camera. I've gradually transitioned to my Sony a7R IV full frame. Both cameras have very similar pixel density and produce similar final results. I typically crop about 1500 pixel wide images from the center of any frame, so the final edits are about equal for both formats. But I've come to prefer the full frame camera because finding is easier with the greater field of view for any given lens.

The a7R IV is the only full frame camera that matches APS-C pixel density, so given a choice between APS-C and any other full frame camera, I'd choose APS-C.

My favorite lenses are a Tamron 28-200mm f/2.8-5.6 Di III RXD on a 10mm extension tube and a Sigma 105mm f/2.8 DG DN ART Macro.

In September I was shooting at f/16 to f/22. I've since discovered that my camera autofocus works in different ways:

1. For f/11 and larger apertures, the lens opens for focus, then stops down for the exposure.

2. For smaller apertures than f/11, it focuses and exposes at the set aperture.

Method 1 delivers more sharp keepers than method 2. So now I shoot at f/11.

Another improvement in my technique is shutter speed. Using my standard aperture- preferred "mode A", the fastest shutter speed with flash was 1/160 or 1/60. But I found that a simple way to speed the shutter is to set the camera mode to Manual and the shutter to 1/250. (I've tried faster than 1/250 with spotty results). I set the ISO to the lowest available (50), and the aperture, as mentioned above, is f11. This is about ten percent or less of the necessary exposure, so about 90% of the light is provided by the flash in TTL mode. The flash duration of 1/10,000s freezes most action except for the bee's very fast wings.

But enough of technique, on to the portfolio.

Honey Bees

Western Honey Bees (often called European Honey Bees) live in large hives of more than 10K individuals. This hive is wild, and in an old pepper tree near my home.

Hive – outside. Hive – inside. I illuminated the cavity with a powerful flashlight to focus. Then added flash for the exposure. A Western Honey Bee with his mandibles (jaws) open and tongue out. Some are gray colored. Note her white neck. I've seen this neck on all types of bees. Another view of a bee's neck. Open mandibles and extended tongue Western Honey Bees are cultivated for pollination. Professional bee keepers bring hives to orchards or fields and leave them while the bees work. A rare lucky shot, on-the-wing and in-focus.

Wild Bees

Wild bees are important pollinators. Many live alone or in small groups. The larger bees are called bumblebees.

Large, smooth black bumblebees are Carpenter Bees. They live alone or in small groups in cavities in wood. They can adopt existing holes, or chew their own. People put "Bee Blocks" in their yards. Any piece of wood with drilled holes. This variety of pollen is structured like tiny doughnuts. These beauties are named Wool Carders. They scrape fuzz from leaves, creating "wool" to line their nests.

Wasps can be quite beautiful. I see them while photographing bees.

That's all for now. I hope you've enjoyed viewing our insect friends. Please treat them well. They help our food to grow.


About the author : Alan Adler lives in Los Altos, California. He has been an avid photographer for 60 years. He is also a well-known inventor with about 40 patents. His best-known inventions are the Aerobie flying ring and the AeroPress coffee maker.

#features #inspiration #tips #alanadler #bee #howto #insects #wildlife

danie10@squeet.me

You're Doing it Wrong: Interesting tips, especially for shorter motorcycle riders, to break bad habits you did not know you had

See You're Doing it Wrong: Parking, Mounting & Dismounting (Bike Basics Ep.1)

#motorcycling #tips

Image/photo

You're Doing it Wrong: Parking, Mounting & Dismounting (Bike Basics Ep.1)In the first episode of my new series, Bike Basics 101, I teach you my time tested m...


https://gadgeteer.co.za/youre-doing-it-wrong-interesting-tips-especially-shorter-motorcycle-riders-break-bad-habits-you-did

You're Doing it Wrong: Parking, Mounting & Dismounting (Bike Basics Ep.1)