2 Likes
1 Shares


The planning took a lot longer than the actual move time, and the downtime for my main blog was really only around 10 minutes. But this has inspired me to also document some of the steps I took for my own future reference. Also, many videos and guides I watched, often only dealt with a single aspect of the migration, such as the Docker volumes backup and restore.
I’m not going to make this a detailed step by step guide as everyone’s situation is different, but hopefully this conceptual overview, and some detail with links, will help many others. I’m not sure yet if I’m going to do an explainer video, but maybe this post will help me make up my mind.
My hosting environment is a hosted VPS service running Ubuntu Linux, with Docker and Portainer, which host various web services, each in their own Docker container and related Docker volumes for persistent storage. One of those Docker containers is a Nginx Proxy Manager reverse proxy which routes incoming requests to the correct web services. There is also an OpenVPN container that allows me to authenticate and drop into the LAN environment to do maintenance. The DNS (for resolving the URL for each service) is handled through a free CloudFlare service. That DNS service points to the correct main public IP address for the server. The theory is, as soon as the service has been backed up and restored (and tested) to the new server, I update the IP address in the DNS to point to the new server, and any visitors get routed immediately to the new server without knowing the difference.
The high-level steps one needs to perform are:
Check some details on your existing server environment such as:
Perform Portainer backup inside Portainer – this saves all the Stacks with their configs to recreate the container images on the new server. It does not backup Docker networks or volumes.
Before I started the actual backups, I first got the new VPS setup with:
install Go (required for Docker-Backup) and installed Docker-Backup on both existing server and new server
Stop containers on existing server before backing up – to ensure all data is written to files and databases can be safely copied. I started with stand-alone services first which were not using the shared database, so I could test them being copied and restored first on the new server. So, my OpenVPN and NginxPM, Wordle, and Glances all worked without the shared database.
Run Docker-Backup on existing server for first one or two container IDs from inside /root/docker-backup with the command ./docker-backup backup --tar <containerID>. Running as root saved those compressed files to /root/docker-backup as a .tar file. This application includes all the volumes for that container as well as user permissions.
Log into terminal on the NEW server, go to /root/docker-backup (because we want to pull across the backed-up file into the same location on the new server). Copy the backed up file from this directory with the command scp root@191.101.59.143:/root/docker-backup/backedupfile.tar backedfile.tar . This will bring across that backed up file into the new server with that same name in /rot/docker-backup. Note for remote scm copy the existing server needs to allow password login, so you may need to reenable that for this to work.
Run Docker-Backup with the restore option to recreate the container’s volumes with all the persistent data and user file permissions, from the backed-up file. The share database will also just be a container volume being restored. You can browse /var/lib/docker/volumes to check the persistent data has been restored. I noted two issues though, and one was sometimes a volume name like glances would not be recreated with that name, but instead a long number of digits (I have no idea why) so I’d verify by its contents what it should be, and then rename it back to glances (or whatever). Also often got the error: Error response from daemon: No such image: kylemanna/openvpn:latest. I solved this in my case by just running docker pull <image-name> to pull the image, before running the restore again which then worked.
In theory now you could just spin up that container and it should work by finding its persistent data in its volumes. For some containers this did not work, and what fixed it, was going into Portainer and opening the Stack for that service, and just forcing a Stack Update (in /Stacks/Edit). In that way I also ensured the container and volumes were all properly connected. Don’t worry, it won’t overwrite any of the volume data you’ve restored.
The above is why I also temporarily opened ports 9000 and 81, so that I could run Portainer and NginxPM from my web browser with just the public IP of the server (easy, and I lock it down as soon as I finished setting up).
That in essence was it, I did this one by one, testing each one. When it came to my blog and the shared database, I just did that batch all together with the database restored first, so that the others could all come online and connect to the database.
My last steps after everything was working and tested, was to close ports 9000 and 81 on the new server, and to shut down the old server and notify the provider to cancel the account.
So, like I said the actual WordPress blog was only down around 10 minutes or so while I backed up and restored that batch with the database. I did my 11GB of photos in Piwigo last as that took longest to copy across and restore. I did ditch my Immich photos setup as I realised, I’d complicated things by having that connect directly into the Piwigo photos volume. That resulted in the Immich backup, including the 11GB of photos, and worse, restoring them in an odd location which was no longer linked to Piwigo. But no harm done, as it was just a test install and all my photos were still safely in, and attached to, Piwigo.
The Docker-Backup install guide was pretty long across more than one page, so I could summarise my steps here as its instructions at https://github.com/muesli/docker-backup and to install Go at https://go.dev/doc/install/source using:
wget -c https://go.dev/dl/go1.22.1.linux-amd64.tar.gz
rm -rf /usr/local/go # In case it exists already
tar -C /usr/local -xzf go1.22.1.linux-amd64.tar.gz
export PATH=$PATH:/usr/local/go/bin
go version # To check its installed
Installing Docker-Backup itself:
git clone https://github.com/muesli/docker-backup.git
cd docker-backup
go build
./docker-backup # Should show help info
In hindsight maybe I would try just the straight backup of the volume data using the docker command docker run --rm --volumes-from dbstore -v $(pwd):/backup ubuntu tar cvf /backup/backup.tar /dbdata and its corresponding restore on the other side.
It all went through fine although I also realised that my Nextcloud setup was quite out of date. I’ve been running it for many years and some of the configuration setup has actually changed. I decided to actually wipe the container as well as all volume data as I’m the only user, and the data is anyway synced from my desktop PC. The new install is way faster, and as soon as I connected the Nextcloud desktop sync again, all my documents and photos were just resynced to the server.
All-in-all about a full day’s research and testing bits of this to see how I’d do it, and I used an afternoon the following day to do the actual migration. It was lots of fun and now at least I know how to switch hosting providers again if I need, or want, to.
#Blog, #docker, #hosting, #migration, #technology
Some XDCC BOTs shield server ports using "reverse DCC". In particular, https://xdcc.eu provides countless links to files in all languages of the world via the host server irc.scenep2p.net, which uses "reverse dcc".
Unfortunately, there are few programs capable of downloading files through this type of protocol. For example, #weechat is not capable of performing this type of download.
#zdl #bash #linux #cygwin #downloader #axel #wget #aria2 #gnu #free #freesoftware #softwarelibero #zigzag #zigzagdownloader #condividetevelo #sharing #streaming #hosting #filehosting #xdcc #dcc #irc #automazione #dccreverse #reversedcc
siehe hier: https://filmpalast.to/stream/cyberbunker-the-criminal-underworld
Ja ist von #Netflix haben sie aber nicht schlecht gemacht. Kommt soweit ich es beurteilen kann alles dran was auch in der Presse stand in den letzten Jahren ...
#Internet #Cyberspace #Cybercrime #Cybersecurity #Hosting #Doku #Dokumentation #Verbrechen #Polizei #Justiz

If you have not set your Linux server/VPS (or workstation if you have the SSH service running) for public key authentication only (way quicker and more secure for later use), then this guide may be really useful. It is one of the easier-to-follow ones that I have seen.
It will help put in place a really basic and essential protection that any Linux server should have. Fail2Ban is a vigilant sentry for your servers. It is one of the most effective shields against unauthorized access attempts, especially brute force.
One of its most valuable things is it acts proactive. In other words, instead of waiting for an attack, Fail2Ban offers an approach by identifying and blocking potential threats in real time. The beauty of Fail2Ban lies in its simplicity and adaptability. Moreover, it is light on resources, so it doesn’t burden your server’s performance.
For any of my servers, straight after changing the admin password, the Fail2Ban service is the immediate next step on my list to activate.
See https://linuxiac.com/how-to-protect-ssh-with-fail2ban/
#Blog, #hosting, #security, #technology
https://www.howtogeek.com/887420/imgur-is-about-to-break-the-world-wide-web/
Ok, everyone is in a tizzy about taking down NSFW images from hidden/not-public folders fine, but there's a bigger problem
"Inactive content" is also being removed, meaning Slightly older tutorials, and forum posts all across the web, Reddit, and many other places may suddenly lose hundreds of thousands of images.
The drop.download hosting service allows free download of high definition movies using an acceptable bandwidth.
#zdl #bash #linux #cygwin #downloader #axel #wget #aria2 #gnu #free #freesoftware #softwarelibero #zigzag #zigzagdownloader #condividetevelo #sharing #streaming #hosting #filehosting #xdcc #dcc #irc #automazione #drop.download
Il servizio di hosting drop.download permette lo scaricamento gratuito di filmati ad alta definizione utilizzando una banda accettabile.
#zdl #bash #linux #cygwin #downloader #axel #wget #aria2 #gnu #free #freesoftware #softwarelibero #zigzag #zigzagdownloader #condividetevelo #sharing #streaming #hosting #filehosting #xdcc #dcc #irc #automazione #drop.download
Updated the redirect service for filecrypt.cc
#zdl #bash #linux #cygwin #downloader #axel #wget #aria2 #gnu #free #freesoftware #softwarelibero #zigzag #zigzagdownloader #condividetevelo #sharing #streaming #hosting #filehosting #xdcc #dcc #irc #automazione #filecrypt
Aggiornato il servizio di reindirizzamento per filecrypt.cc
#zdl #bash #linux #cygwin #downloader #axel #wget #aria2 #gnu #free #freesoftware #softwarelibero #zigzag #zigzagdownloader #condividetevelo #sharing #streaming #hosting #filehosting #xdcc #dcc #irc #automazione #filecrypt
The Vupload service allows you to download the stream of medium definition video files using a rather high bandwidth
#zdl #bash #linux #cygwin #downloader #axel #wget #aria2 #gnu #free #freesoftware #softwarelibero #zigzag #zigzagdownloader #condividetevelo #sharing #streaming #hosting #filehosting #xdcc #dcc #irc #automazione #vupload
Il servizio Vupload permette lo scaricamento dello stream di file video con definizione media utilizzando una banda piuttosto elevata
#zdl #bash #linux #cygwin #downloader #axel #wget #aria2 #gnu #free #freesoftware #softwarelibero #zigzag #zigzagdownloader #condividetevelo #sharing #streaming #hosting #filehosting #xdcc #dcc #irc #automazione #vupload
#datasafety #crypto #cloud #sia #siastorage #crypto #datengrab #securespace
http://7bpwizoqcia6q53sfydvsvyytixha54xwsixzlojepcydvqmmeii3yid.onion
nextcloud mit sia-storage - register here:
http://register.7bpwizoqcia6q53sfydvsvyytixha54xwsixzlojepcydvqmmeii3yid.onion/
#storage #darknet #securestorage #speicherplatz #monero #hosting #webspace #russia
Is there a cloud provider similar in price to #Hetzner but in the US? The round trip times are hard to bear. If I curl from my old cluster to the new, it takes about 3ms. If I do the same exercise from home, it’s about 900ms. The trouble is, I can’t find a cloud server close to that price here. What I can get here are large, bare-metal servers with tons of bandwidth and storage for cheap.
Hetzner does offer US servers, but they’re 50% more than the European equivalents. I’m not certain the extra performance is worth it.
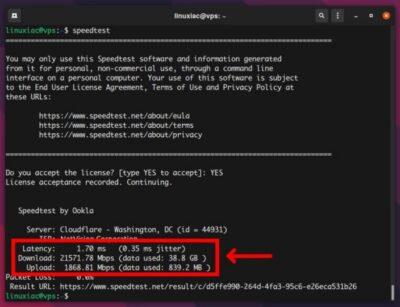
When it comes to choosing the right VPS (Virtual Private Server) server for your solution, you may want to test its performance. The most important factors to consider when purchasing a VPS are Internet connection speed, disk I/O speed, and CPU performance.
This is useful when testing out a bargain hosted VPS. It may be a good cost per month, but will it still have acceptable performance. You can sign up for a new VPS and then test it, and if it is not up to scratch, it is better to cancel it before moving and installing all your applications onto it.
This article explains how to perform these benchmarks remotely from your VPS. I did find it was geo-blocked for some reason, so I had top open it using a VPN for the USA.
See https://linuxiac.com/measure-linux-vps-performance/
#technology #hosting #benchmarking #VPS #performance
#Blog, ##benchmarking, ##hosting, ##performance, ##technology, ##vps